Part 1

Start here

What SkillPass does for you, and what to have ready before you begin.

What SkillPass does

SkillPass runs the whole training journey in one place, from the day someone finds your course to the day an employer checks their certificate.

  • You get your own registration website, for example yourname.skillpass.my.
  • Participants register and pay from their phone. Online payments go straight to your own CHIP account.
  • On the training day you take attendance by scanning each person's ticket QR.
  • After the training you issue e-certificates in one click. Anyone can check a certificate is real by scanning its QR code.
What to have ready

You can start with just an email address. These make your site complete:

  • Your logo (a square image works best).
  • Your bank account details, if you accept bank transfers.
  • Your SSM number and business address, for the receipts.
  • A CHIP account, if you want online payment by FPX, card or e-wallet. No account yet? We can help you open one (see Payments).
  • A picture of your certificate design (PNG or JPG), without names on it.

Set things up in the order of this guide. Each part takes a few minutes.

Part 2

Create your account and site

Sign up, then choose your site's name and web address.

Sign up

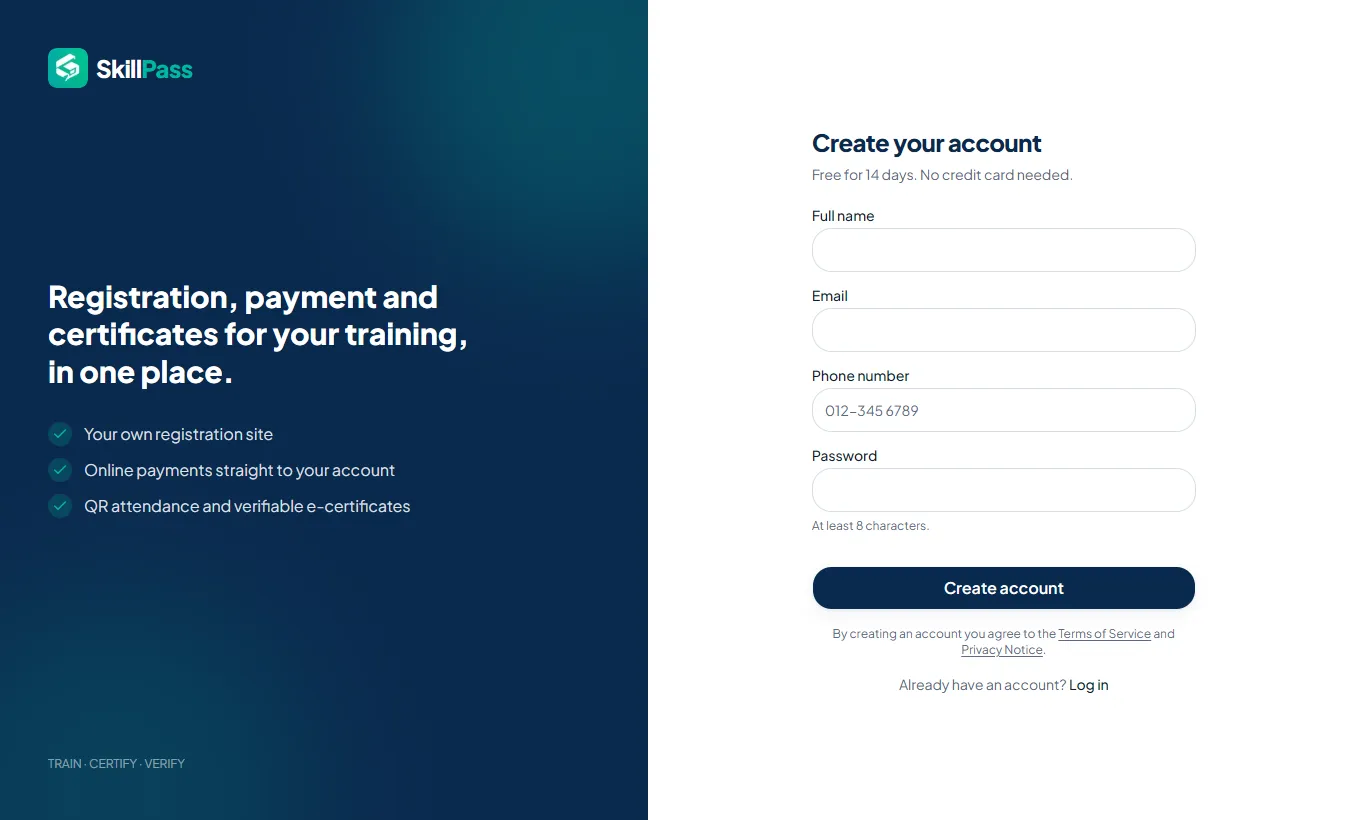
Go to skillpass.my and tap Start free trial. Enter your name, email, phone number and a password (at least 8 characters).

Your first 14 days are free and no card is needed.

One login belongs to one organisation. To help run another organisation, ask its owner to invite you with a different email.

The sign-up page with name, email, phone and password fields

Create your training site

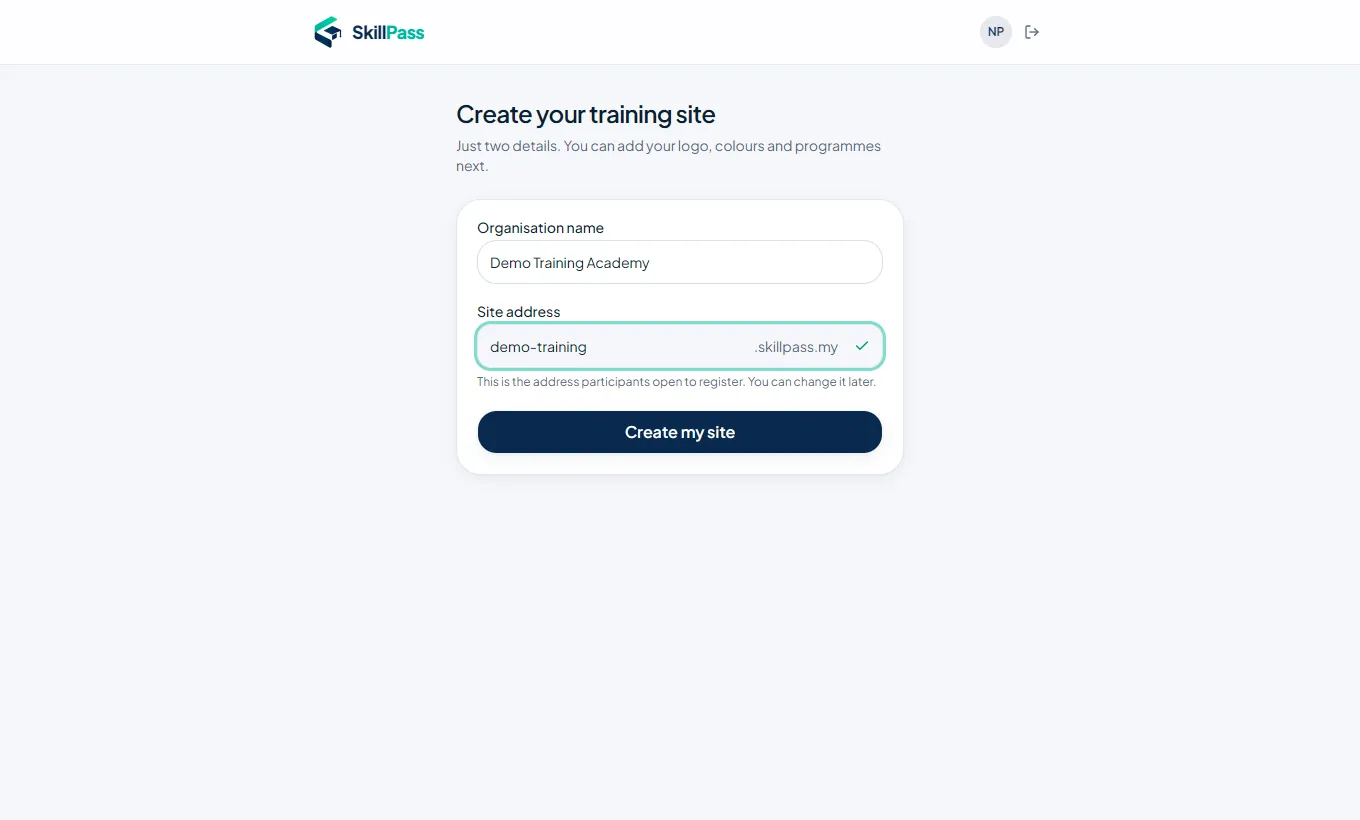
Type your organisation's name and choose your site address. This becomes your website, for example demo-training.skillpass.my.

A green Available label means the address is free. Tap Create my site.

Keep the address short and easy to say, because participants will type it.

Create your training site: organisation name and site address

Part 3

Find your way around

What each part of the menu is for.

Your Overview

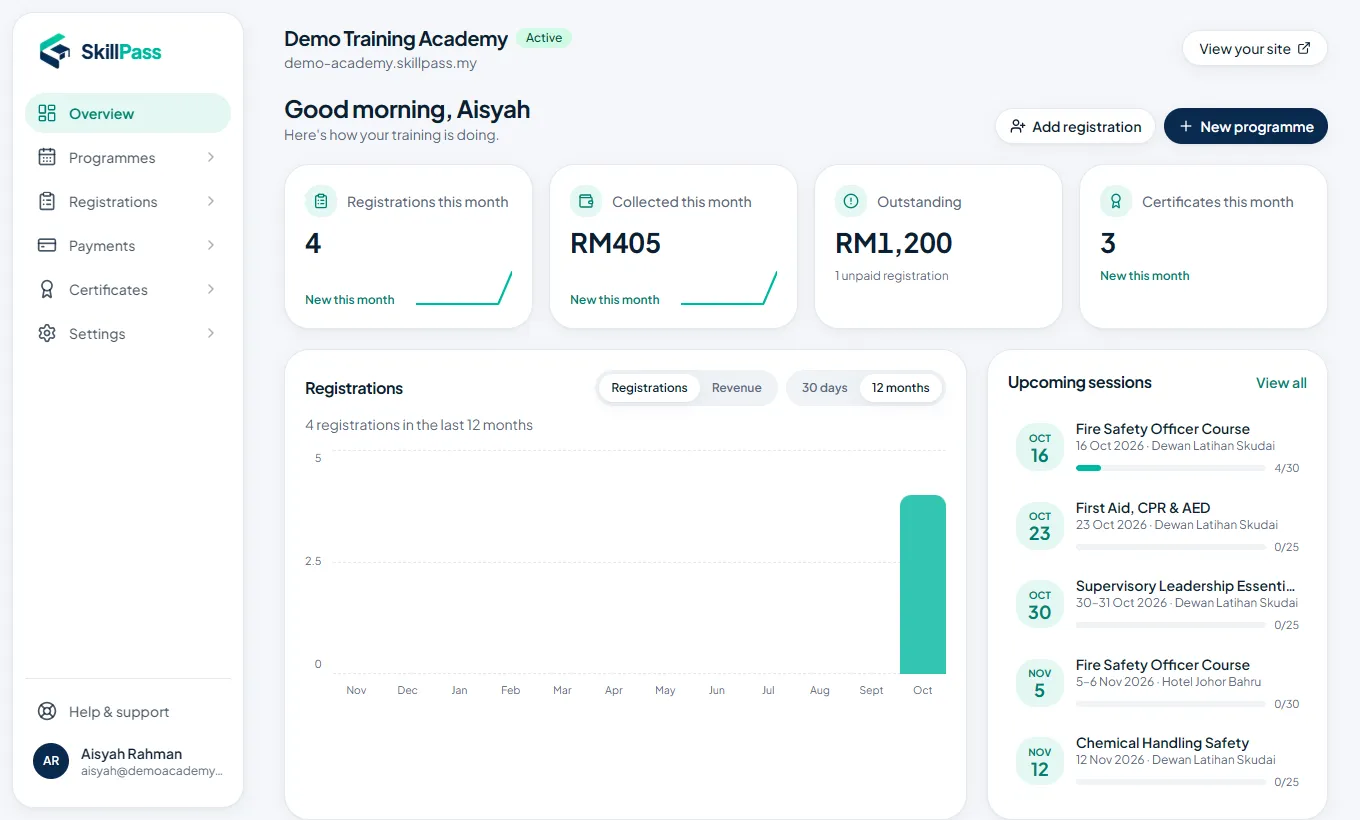
Overview is the first page after you log in. It shows this month's registrations, money collected, money still owed and certificates issued, plus your upcoming sessions.

If something needs your attention, such as a payment slip to check, it appears here too.

The Overview page with monthly numbers, a chart and upcoming sessions

The menu

The menu on the left (on a phone, tap the menu button at the bottom) has six parts:

  • Overview: your numbers and to-dos.
  • Programmes: your courses, their dates (sessions), registration forms and attendance.
  • Registrations: everyone who registered, walk-ins you add yourself, and your participant list.
  • Payments: every payment, with filters for slips to check and unpaid registrations.
  • Certificates: issue, design and look up certificates.
  • Settings: your site, payments, emails, team, plan and downloads.

View your site (top right) opens your public website in a new tab, so you can see what participants see.

Part 4

Set up your website

Your name, logo, colour, contact details and the questions people often ask.

Site details

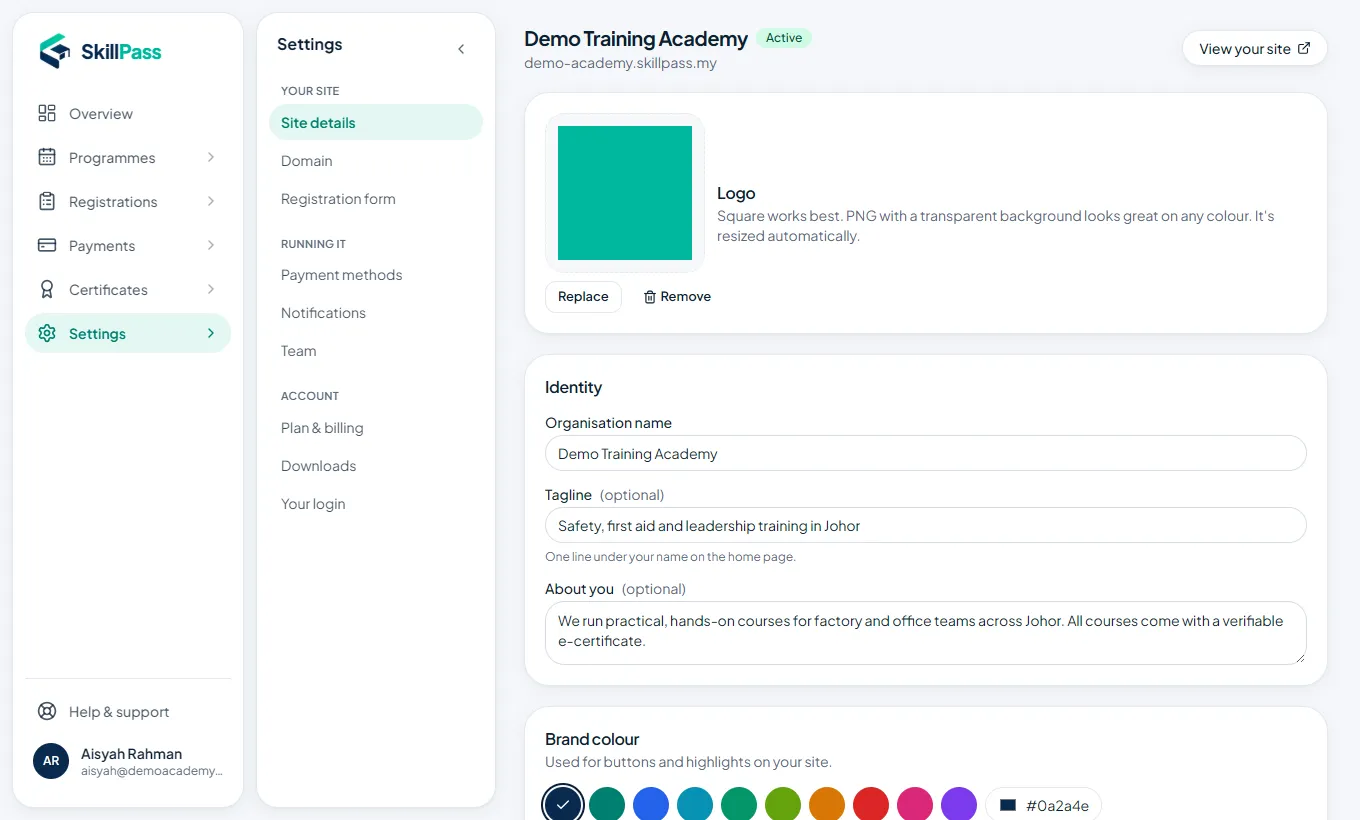
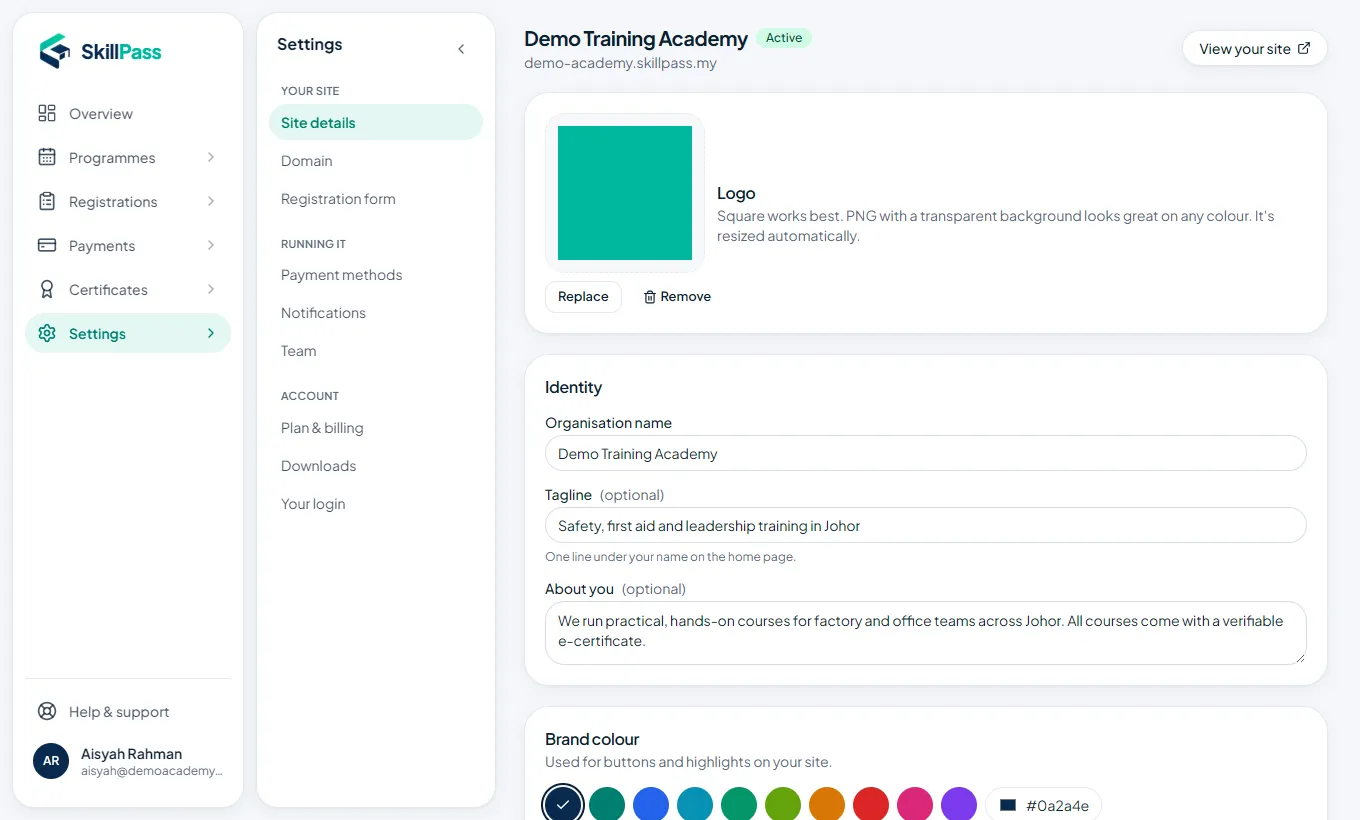
Go to Settings → Site details. Fill in a tagline (one line under your name), a short About you, and pick a brand colour for your buttons.

Add your phone, WhatsApp number (with 60 in front, e.g. 60123456789), email and address. They appear on your site so participants can reach you.

Upload your logo, then tap Save settings.

Site details: organisation name, tagline, about, brand colour

Questions, testimonials and policies

Lower on the same page you can add frequently asked questions, what past participants said, and your refund and privacy policies.

These show on your home page and in the Account tab on phones. Tap Save when done.

Good questions to answer: Is lunch provided? Is the course HRD Corp claimable? What should I bring?

Adding questions, testimonials and policies

Part 5

Get paid

Online payment with CHIP, bank transfer, HRD Corp and company invoices. Plus the details printed on your receipts.

Online payment with CHIP

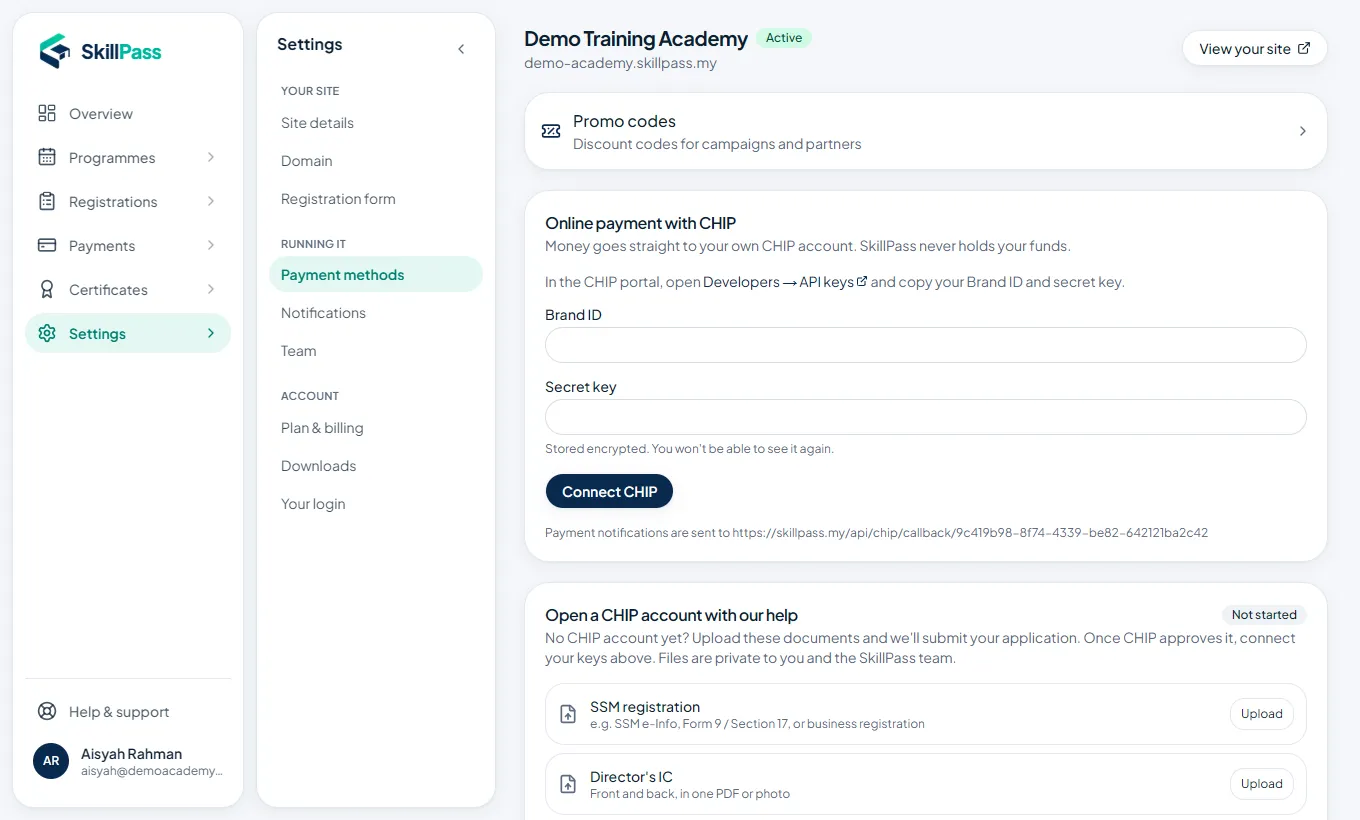
Go to Settings → Payment methods. Log in to your CHIP portal, open Developers → API keys, and copy your Brand ID and Secret key into the two boxes. Tap Connect CHIP.

Participants can then pay by FPX, card or e-wallet, and the money goes straight to your CHIP account. SkillPass never holds your money.

No CHIP account yet? On the same page, under Open a CHIP account with our help, upload your SSM and IC. We will submit the application for you.

Connecting CHIP with your Brand ID and secret key

Bank transfer, HRD Corp and invoices

On the same page, tick the ways participants may pay:

  • Bank transfer: participants transfer to your account and upload their slip. You check it and approve. Their seat is held for the hours you choose.
  • HRD Corp claim: the seat is confirmed straight away and you collect payment through the grant later.
  • Company invoice / LO: the seat is confirmed now and the company pays on invoice.

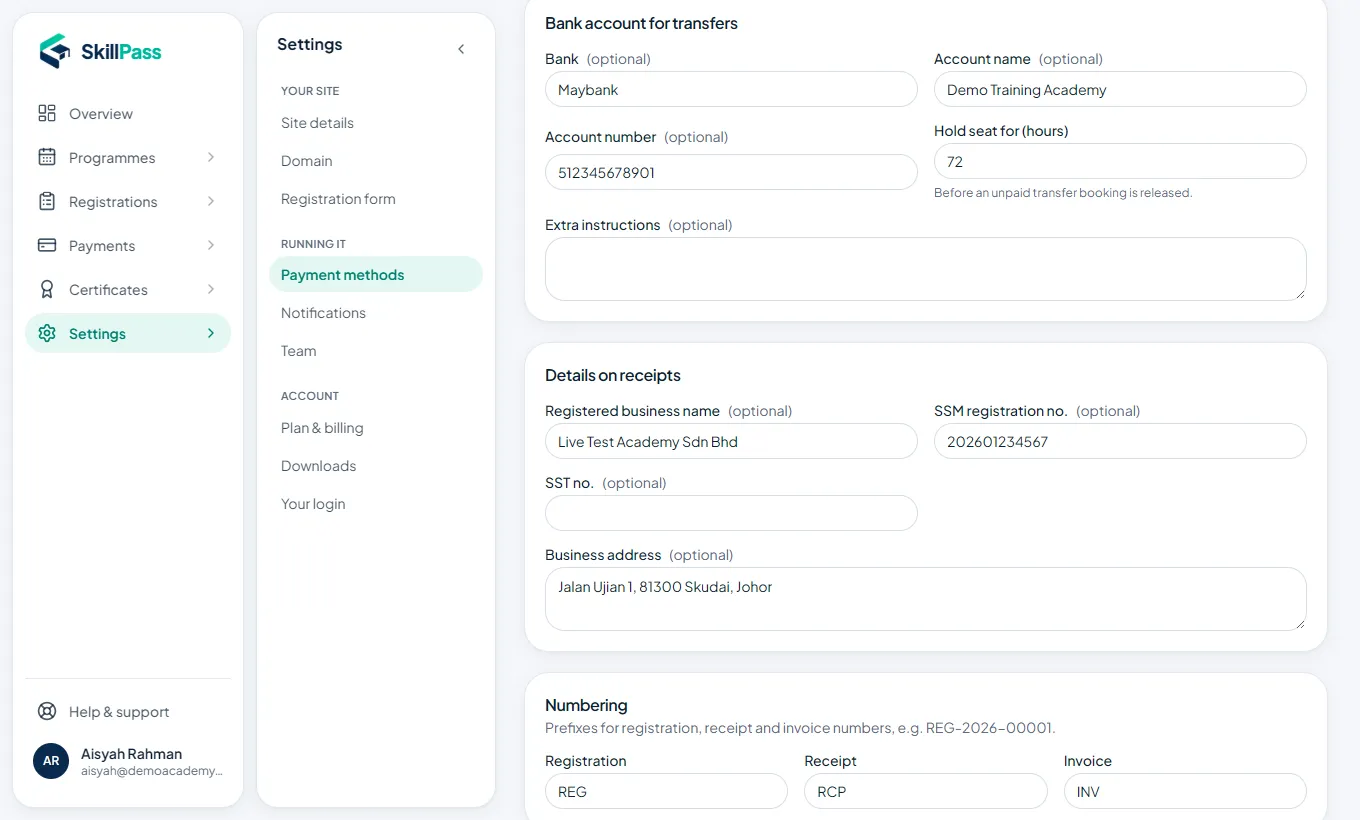
Fill in Registered business name, SSM registration no. and Business address. They are printed on every official receipt.

Business details for receipts: registered name, SSM no., SST no., address

Part 6

Choose your plan

Pick a plan before your free trial ends.

Plan & billing

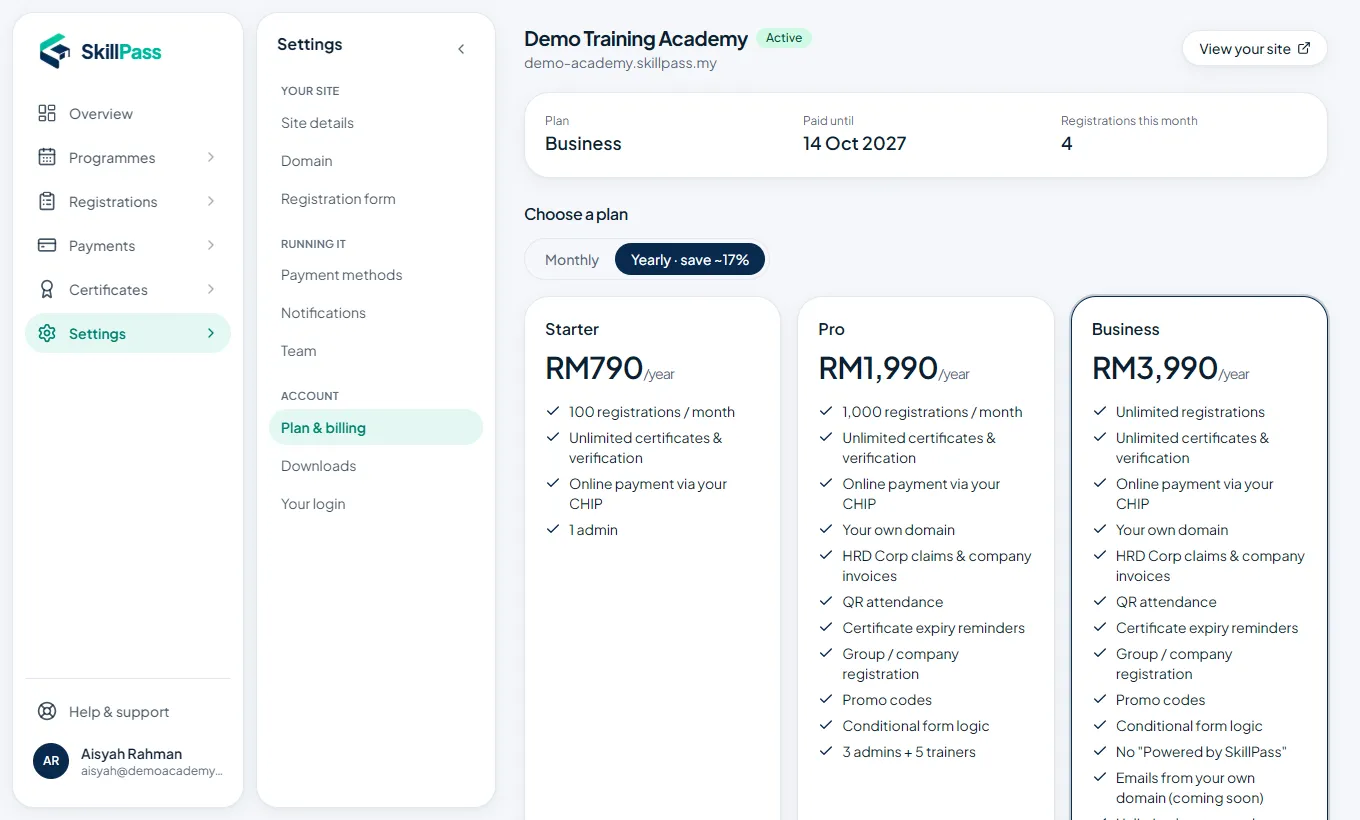
Go to Settings → Plan & billing. Compare the plans, choose monthly or yearly, and tap Choose. You pay securely through CHIP.

Your invoices and receipts are listed on the same page.

Plan & billing with the available plans

Part 7

Add your team

Invite colleagues and trainers with the right access.

Invite someone

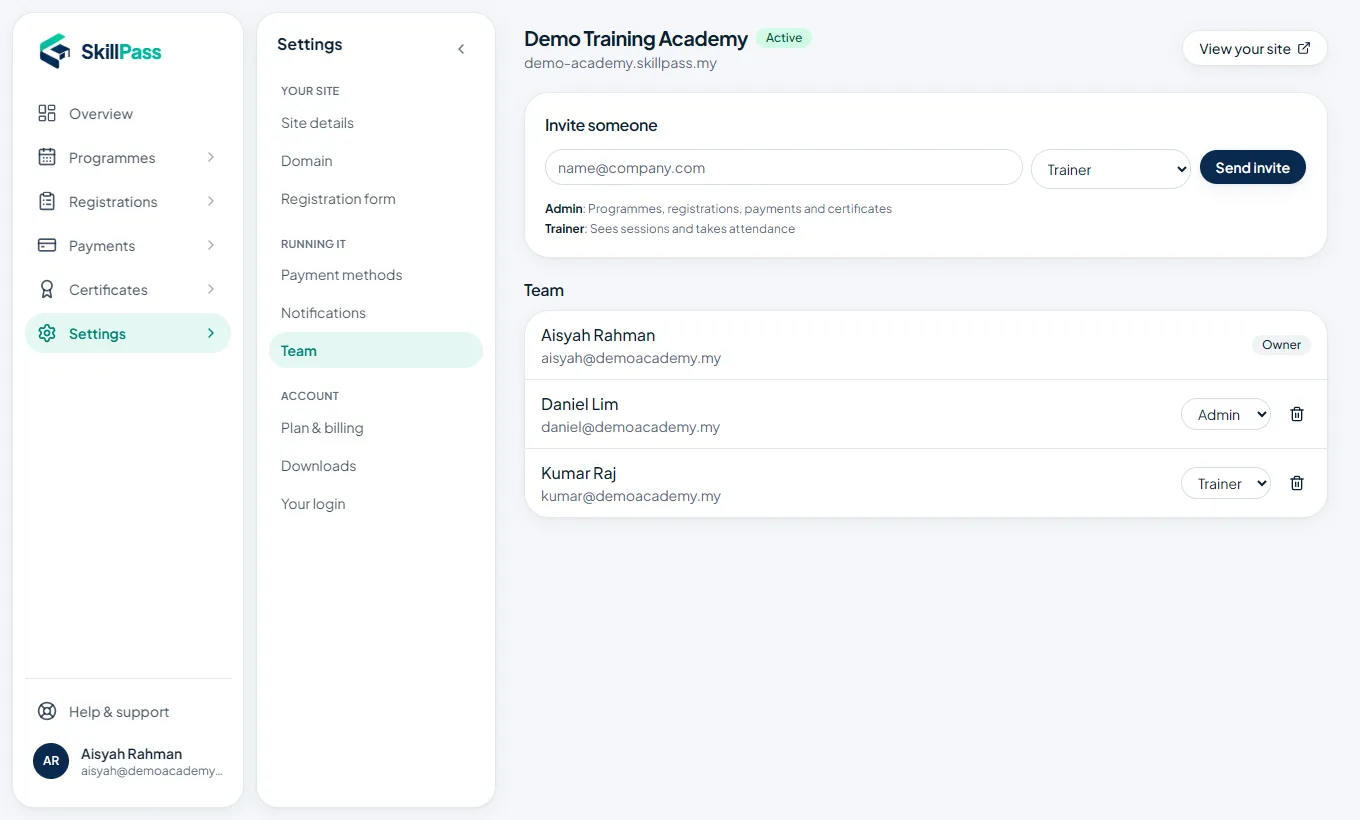
Go to Settings → Team. Enter their email, choose a role and tap Send invite. They get an email with a link to join.

  • Owner: everything, including the plan, billing and the CHIP account.
  • Admin: everything except billing and the payment account. Good for your office staff.
  • Trainer: programmes and attendance only. Trainers cannot see payments, registrations or money.

Trainers can take attendance on any day, so they can fix a missed scan after the training.

Team page: invite by email and choose Admin or Trainer

Part 8

Create your programmes

A programme is a course. A session is one intake of it, with its own dates, venue and seats.

Your programme list

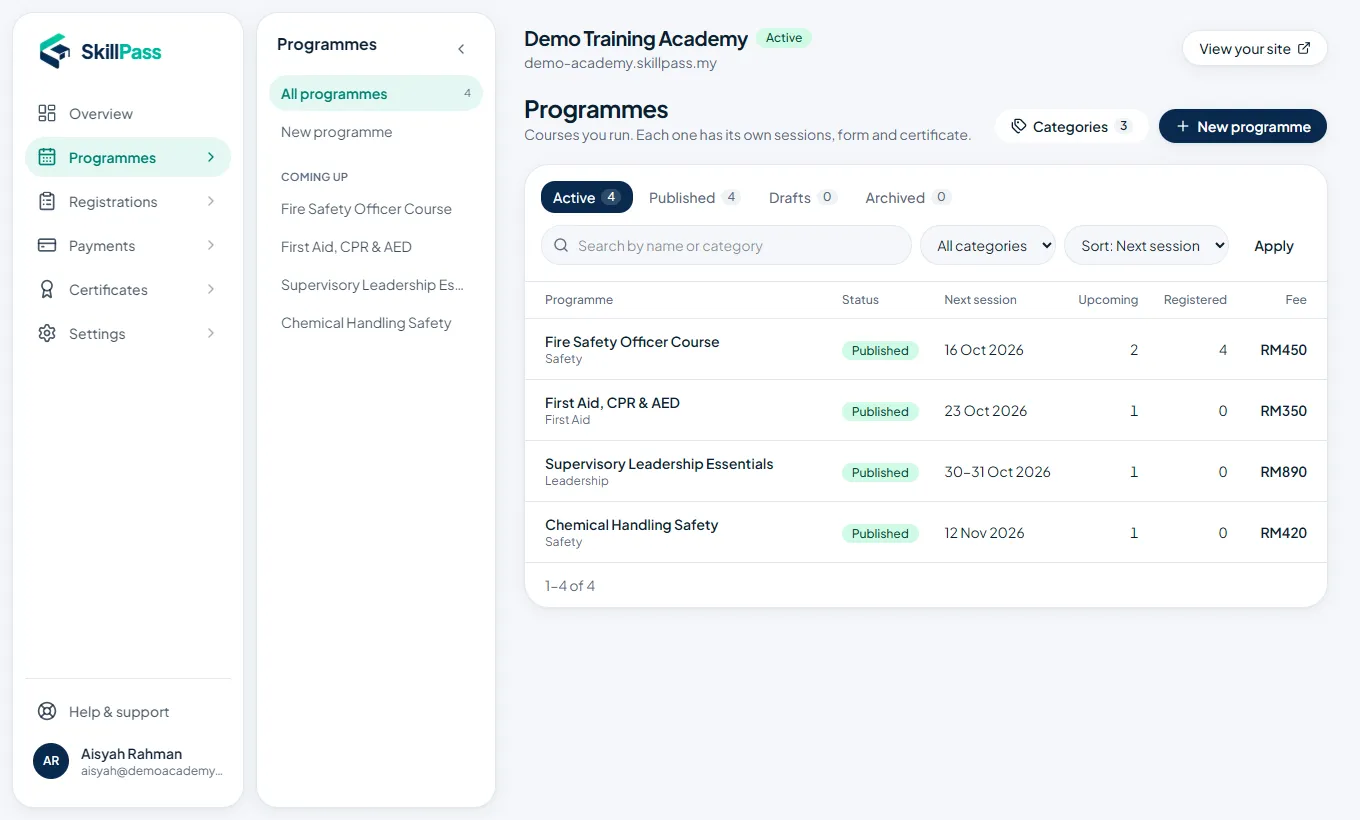
Programmes shows every course with its status: Active (published or draft) and Archived. Use the search box and filters when the list gets long.

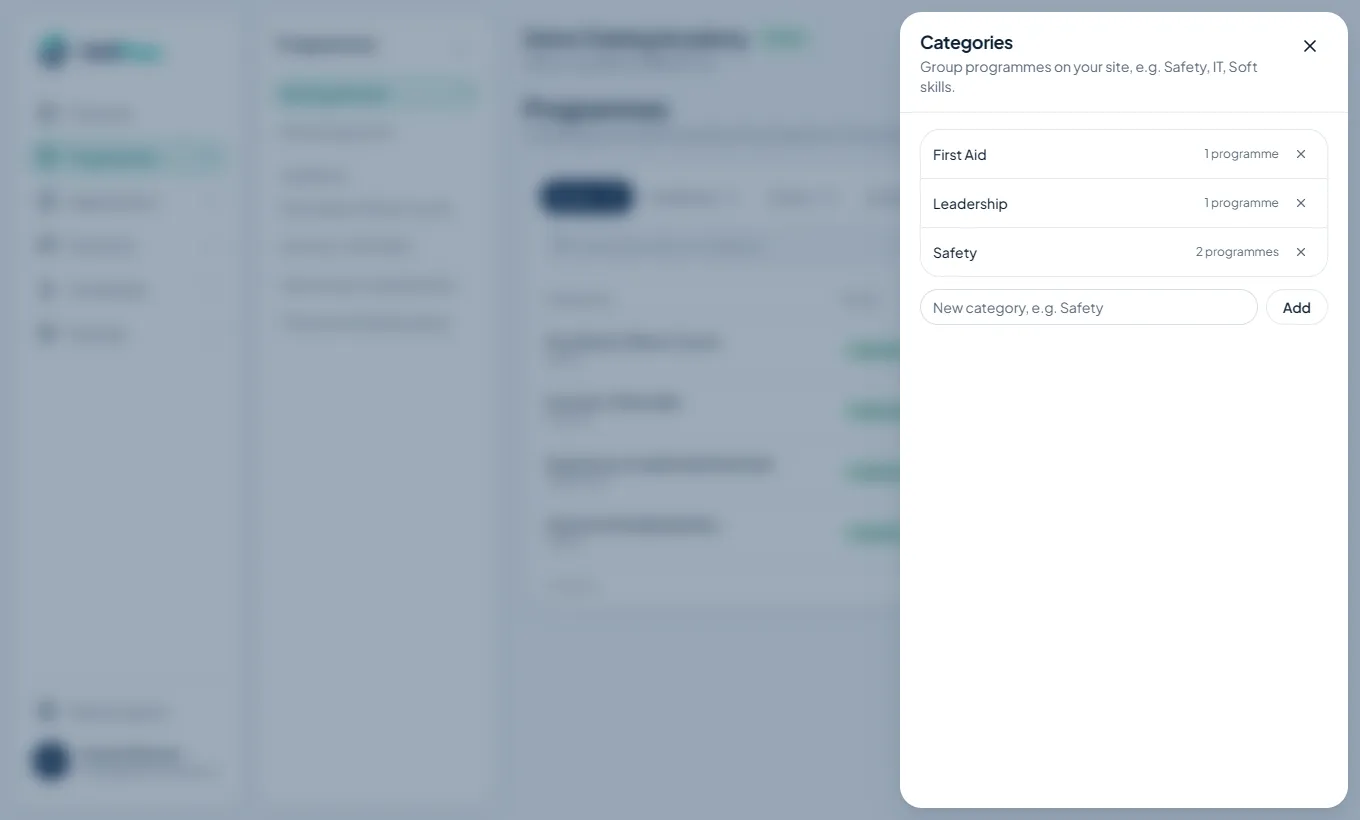
Categories (button at the top) groups your courses on your website, for example Safety, First Aid and Leadership.

The programme list with status tabs and search

Categories

Tap Categories, type a name and tap Add. Each category shows how many programmes it has. Participants can filter by category on your site.

The Categories panel: add and remove categories

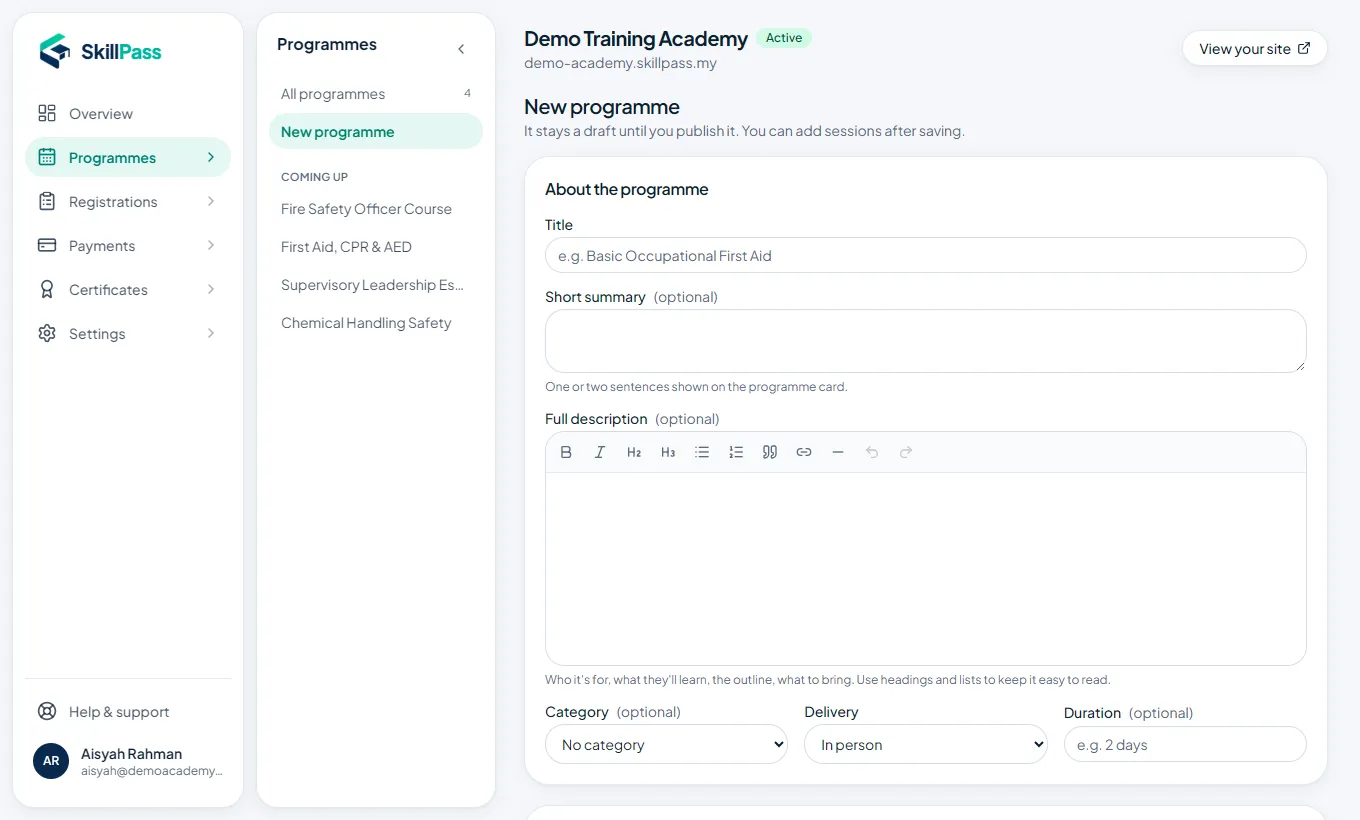
New programme: the basics

Tap New programme. Enter the title, the price in RM (0 for free), and a short summary for the programme card.

Write the full description with headings, bold and bullet points: what they will learn, who it is for, what is included.

Choose the category, delivery (in person, online or both) and duration.

New programme form: title, price, summary and description

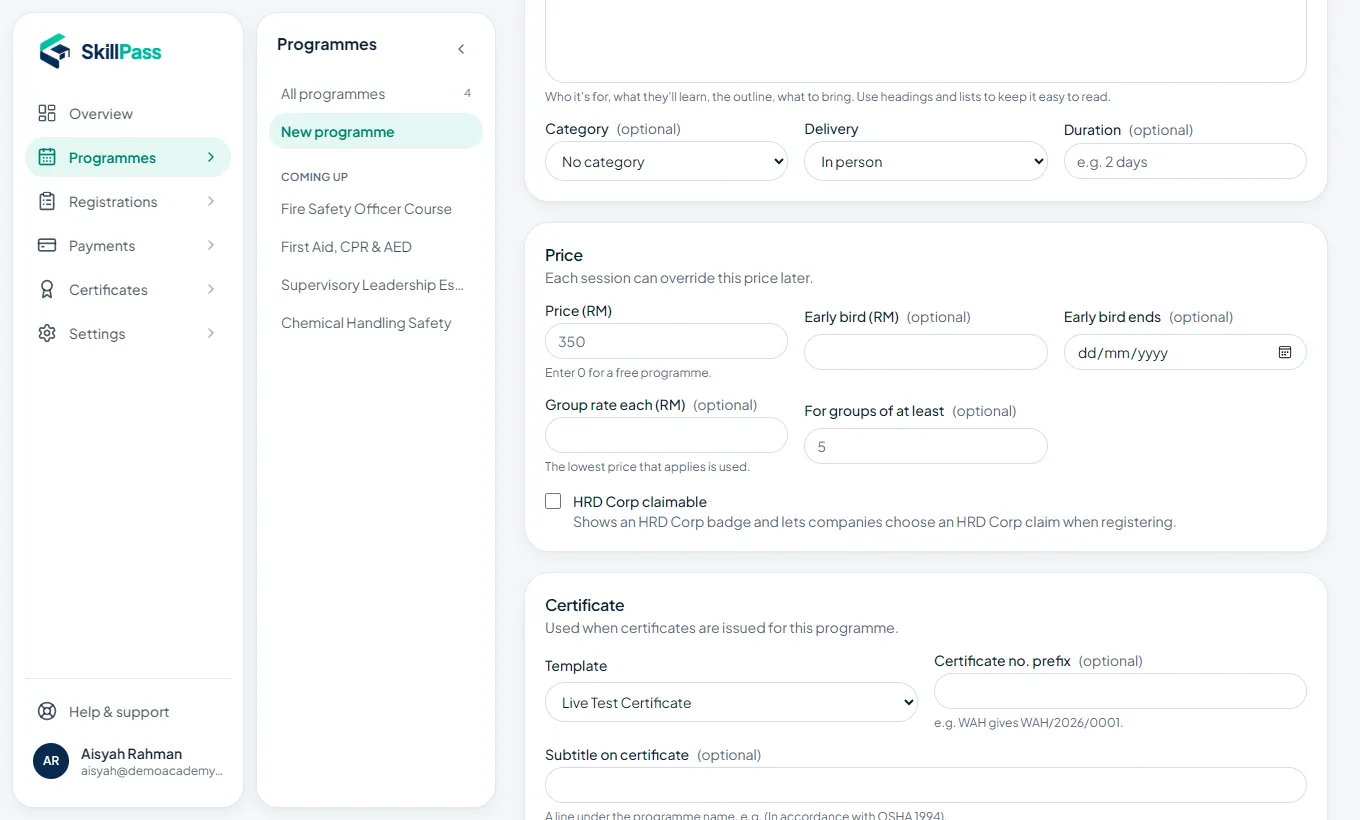
Group rates, early bird and certificates

Further down the same form:

  • Group rate: for example RM400 each when 3 or more register together.
  • Early bird: a lower price until a date you choose.
  • Certificate: the template, a number prefix (e.g. FSO gives FSO/2026/0001), how long it stays valid, and the minimum attendance needed.
  • HRD Corp claimable: shows a badge on your site.

Tap Create programme. It starts as a draft, so nobody sees it until you publish.

Group rate, early bird and certificate settings

Add sessions and publish

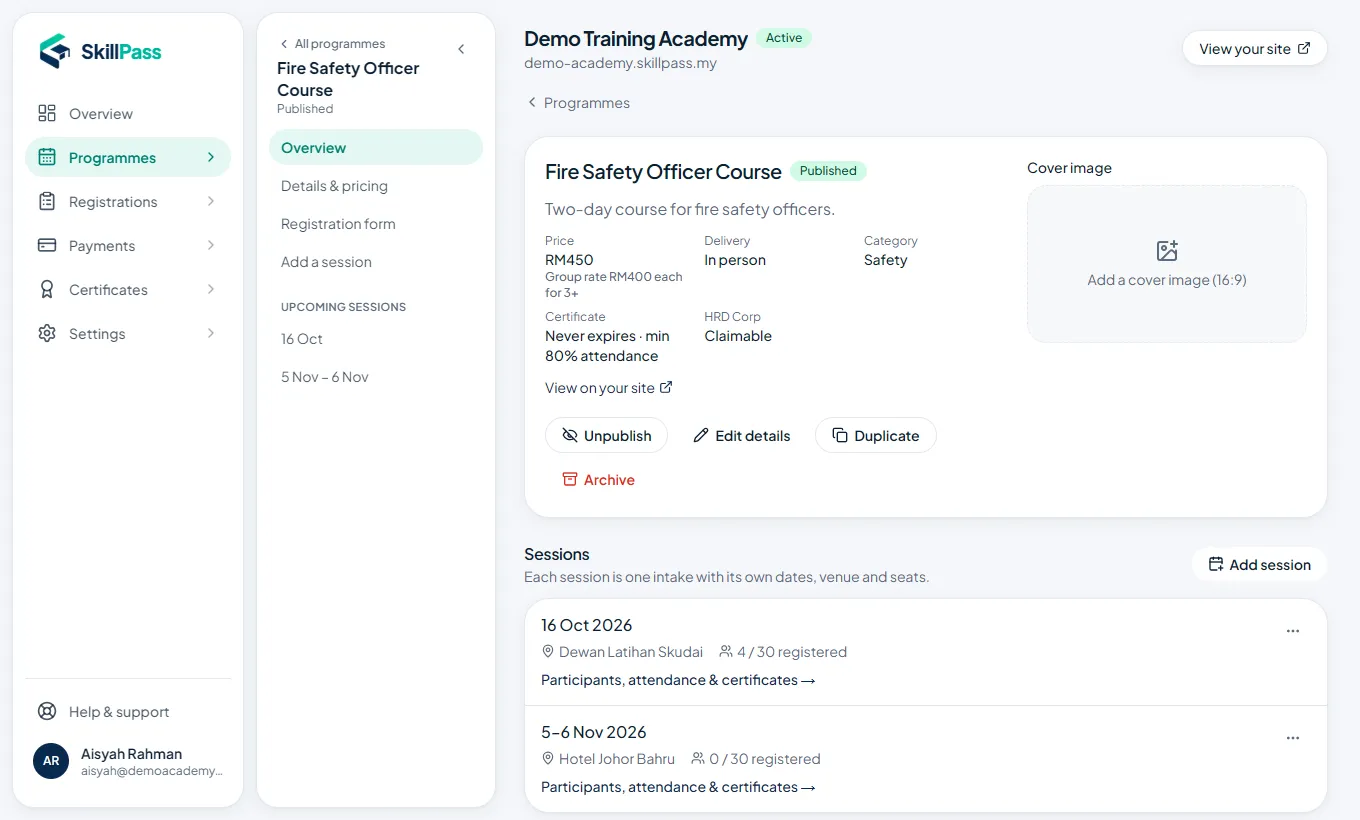
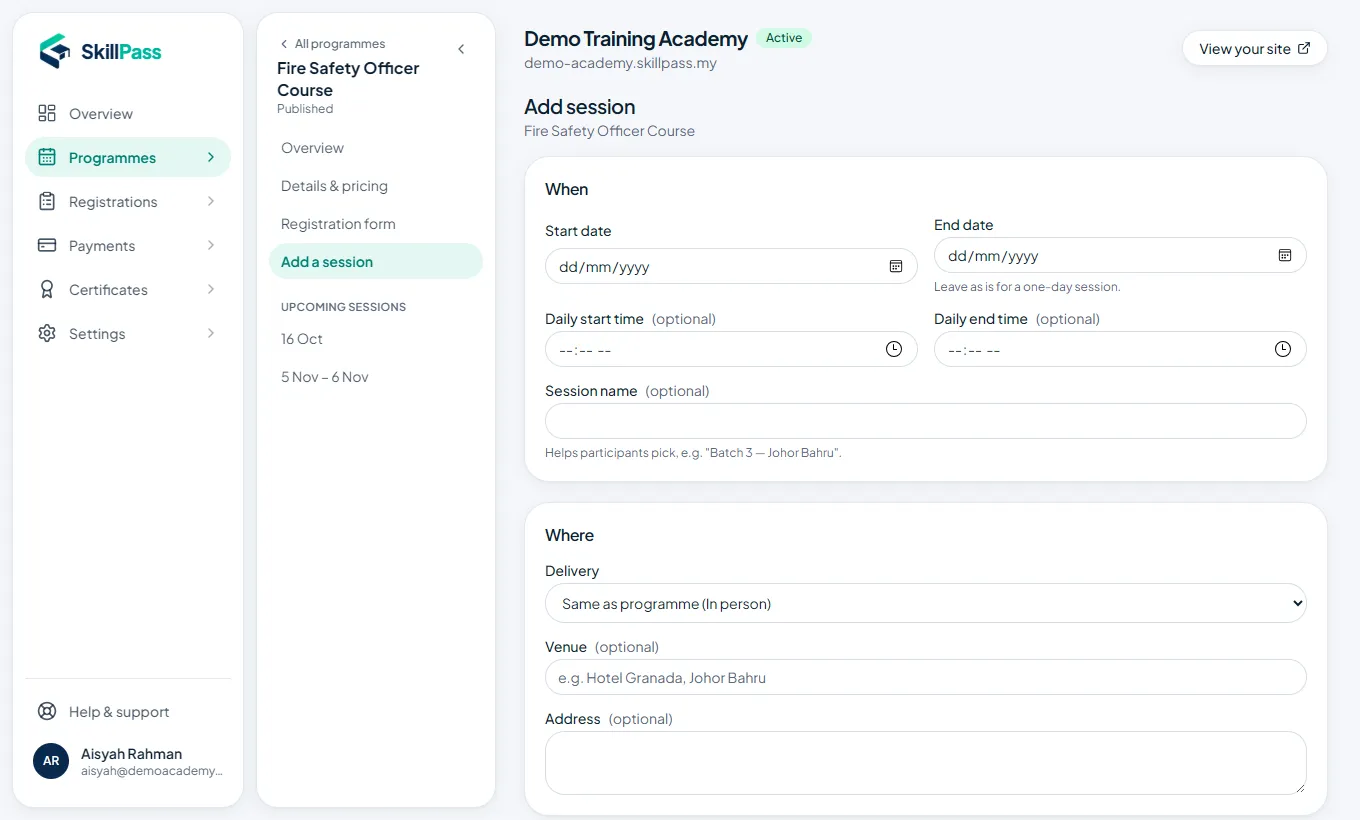
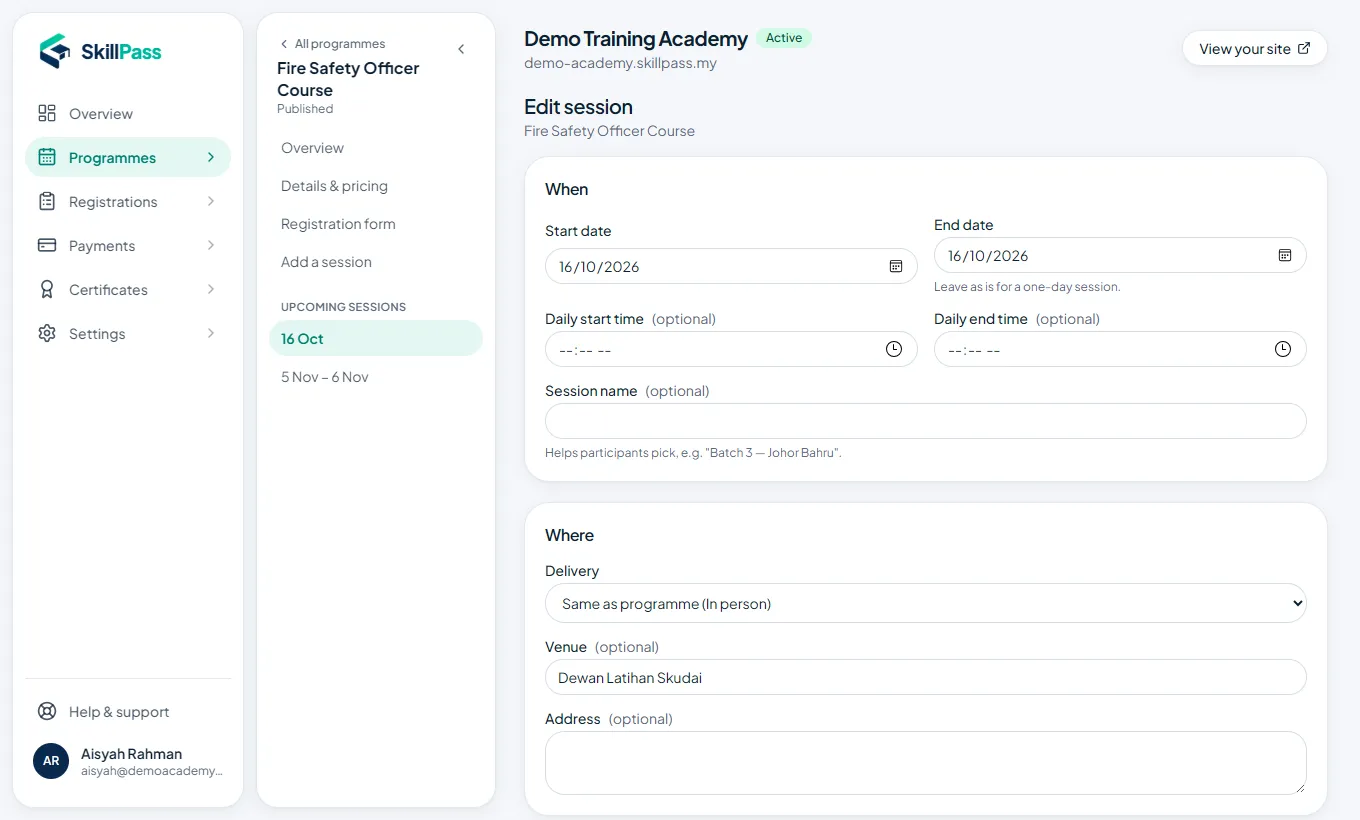
On the programme page, tap Add session. Enter the start and end dates, times, venue and number of seats. Add as many sessions (intakes) as you need.

When ready, tap Publish. The programme appears on your website straight away.

Add a cover image (16:9) to make the programme card stand out.

A programme page with Publish, cover image and its sessions

Session details

Each session has its own seats and can have its own price, trainer and registration closing date. When it is full, new people join a waitlist automatically.

Add a session: dates, times, venue and seats

Registration form

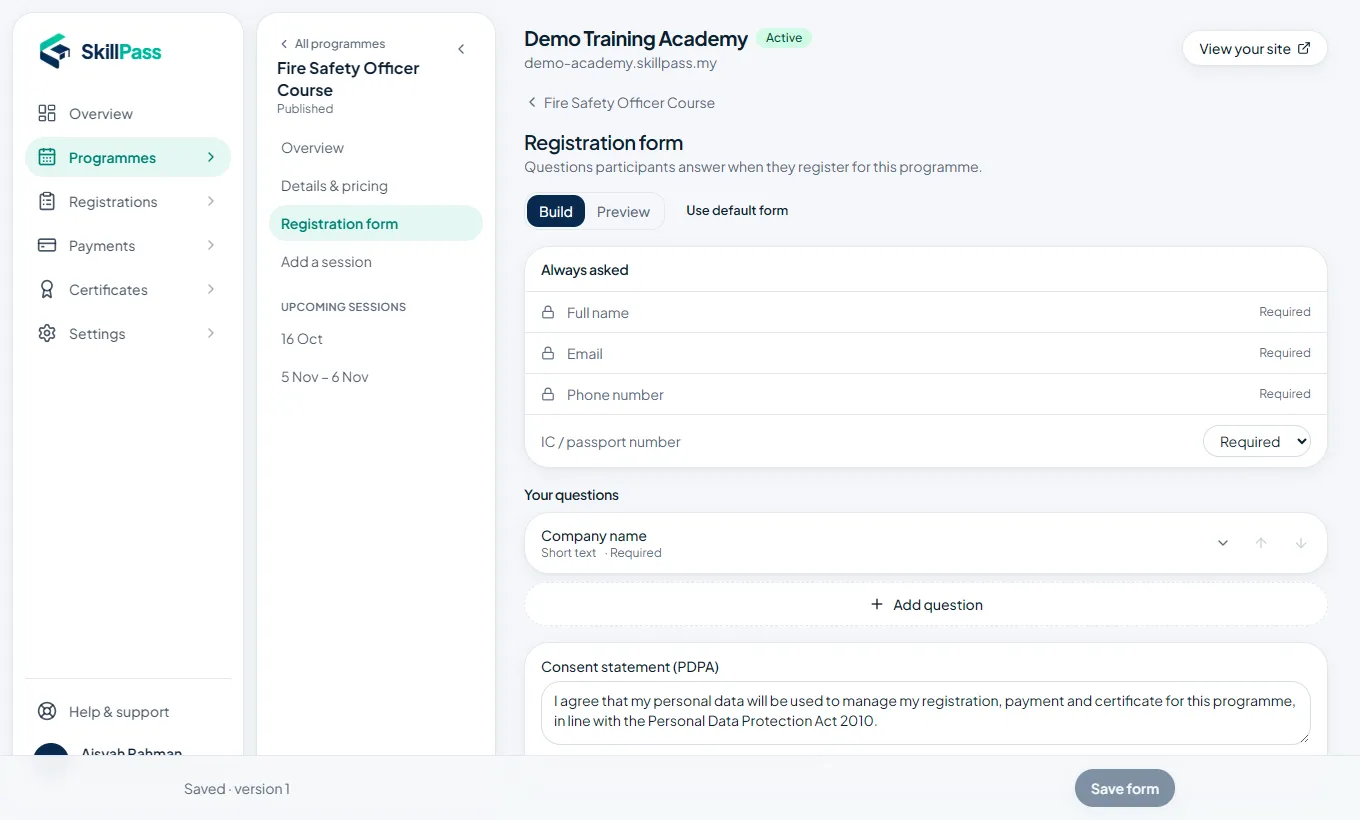
Name, email and phone are always asked. You choose whether to ask for IC or passport number.

Tap Add question to ask more: short or long text, dropdown, multiple choice, yes/no, date, Malaysian state, file upload or signature.

Questions can appear only when an earlier answer matches (for example, ask for a dietary need only if they answer Yes). Tap Save form when done.

Set up a default form once in Settings → Registration form, and every new programme uses it.

The registration form builder with your own questions

Promo codes

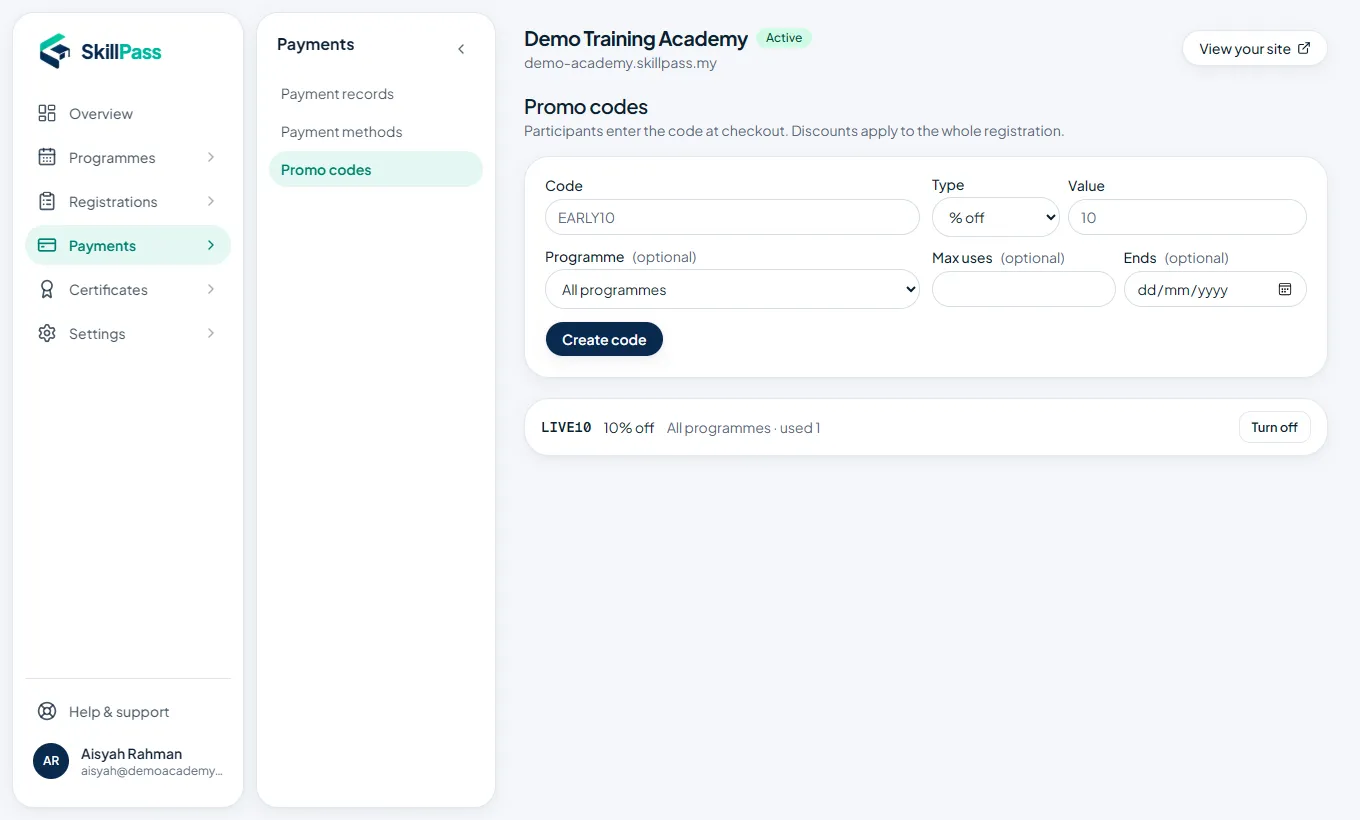
Settings → Payment methods → Promo codes. Create a code (e.g. MERDEKA20), choose % off or RM off, and optionally limit it to one programme, a number of uses or an end date.

Promo codes: code, type, value, limits

Part 9

What participants see

Your website works like an app on a phone and like a course marketplace on a computer.

Home page

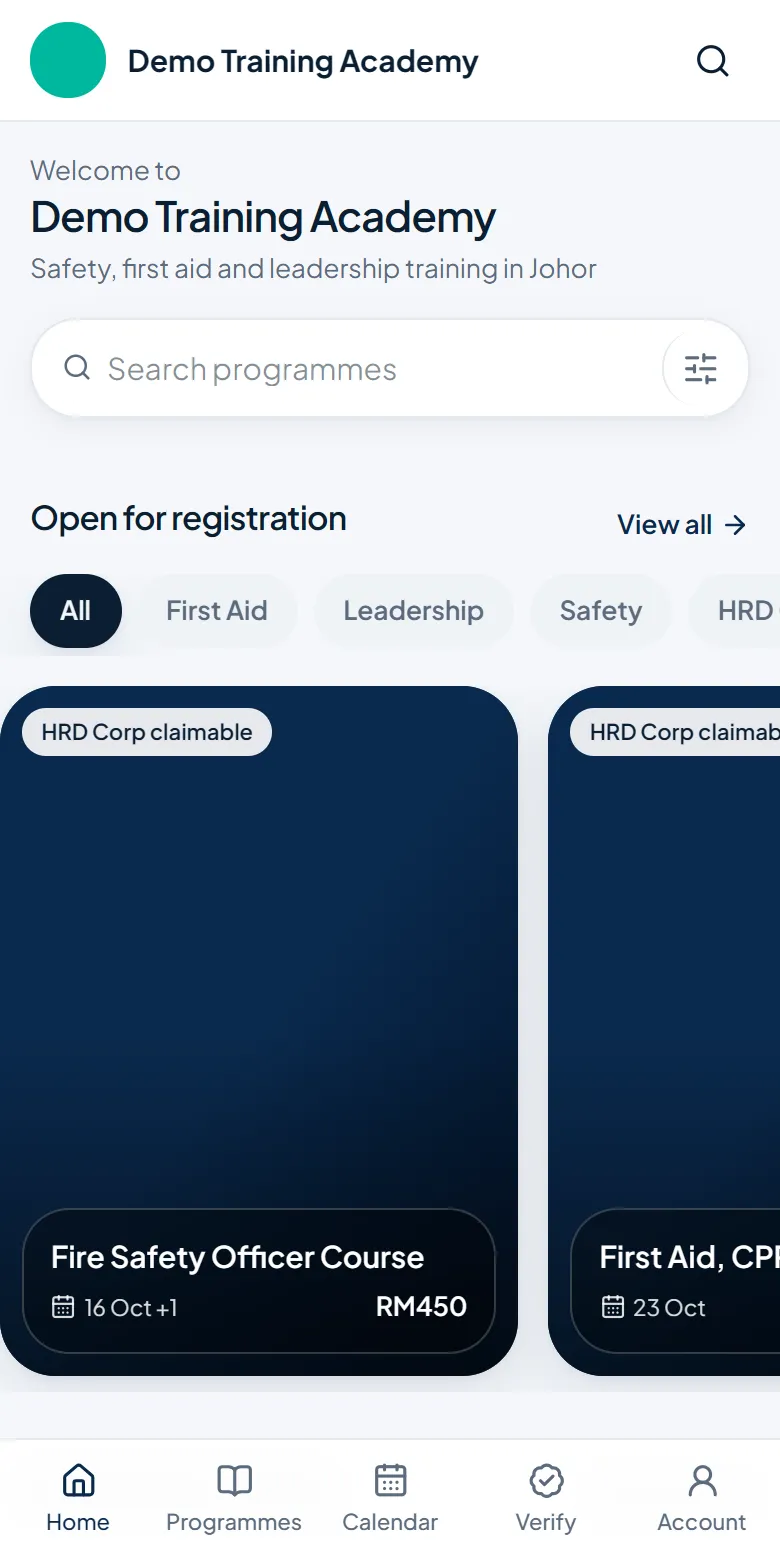
Participants see your name and tagline, a search box, topic buttons (your categories), your programmes and the next sessions. The bar at the bottom takes them to Programmes, Calendar, Verify and their Account.

Phone view of the provider's home page

Programmes and calendar

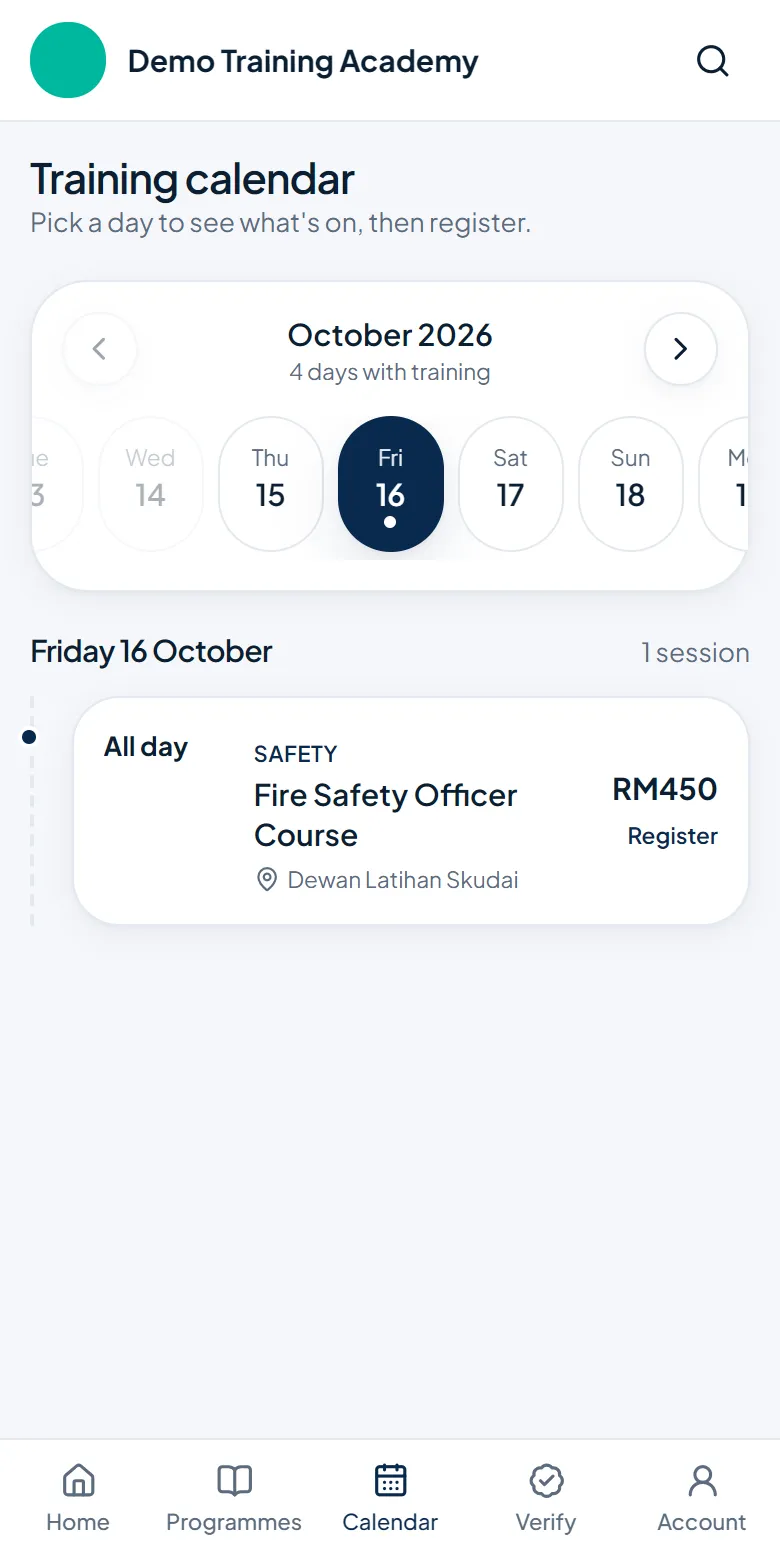
Programmes lists every open course. Calendar shows which days have training, so people can pick a date that suits them.

Phone view of the training calendar

Programme page

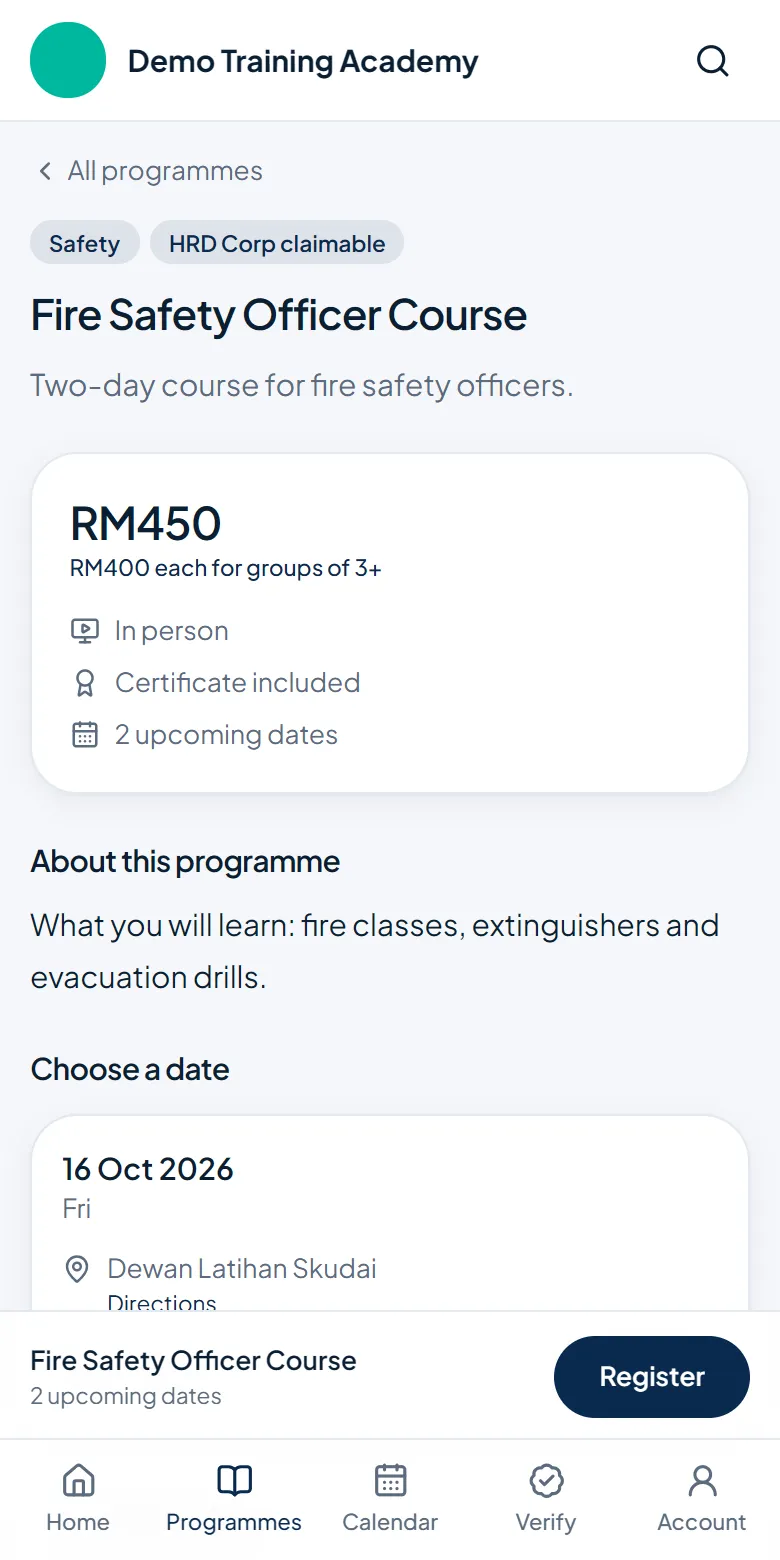
Each programme shows its price, group rate, sessions and seats left, and your full description. A Register button sits at the bottom.

Phone view of a programme page

Part 10

How someone registers

Three short steps: date, details, confirm.

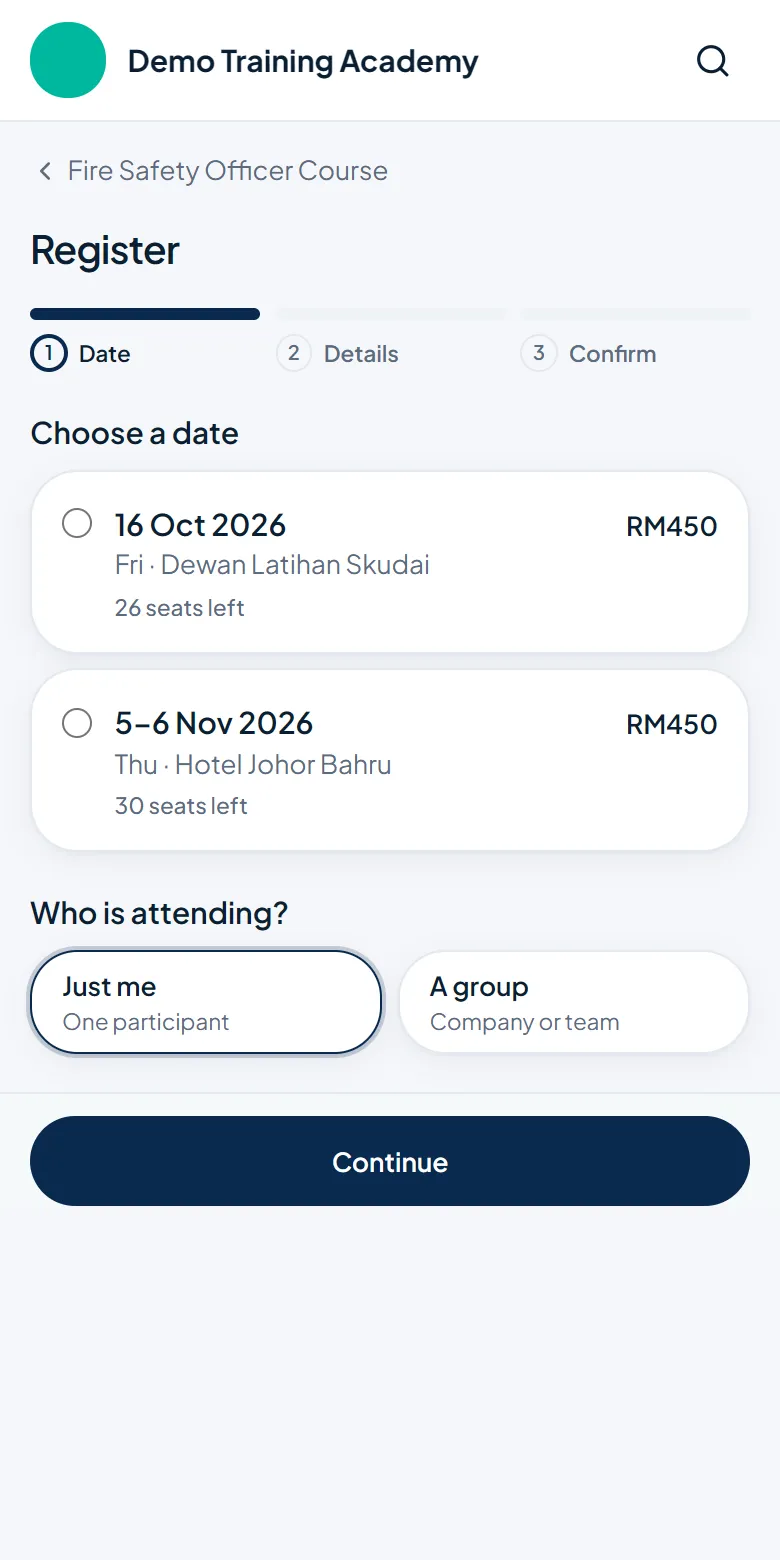
1. Choose a date

They pick a session, then choose Just me or A group (a company sending several people).

Registration step 1: choose a date and who is attending

2. Their details

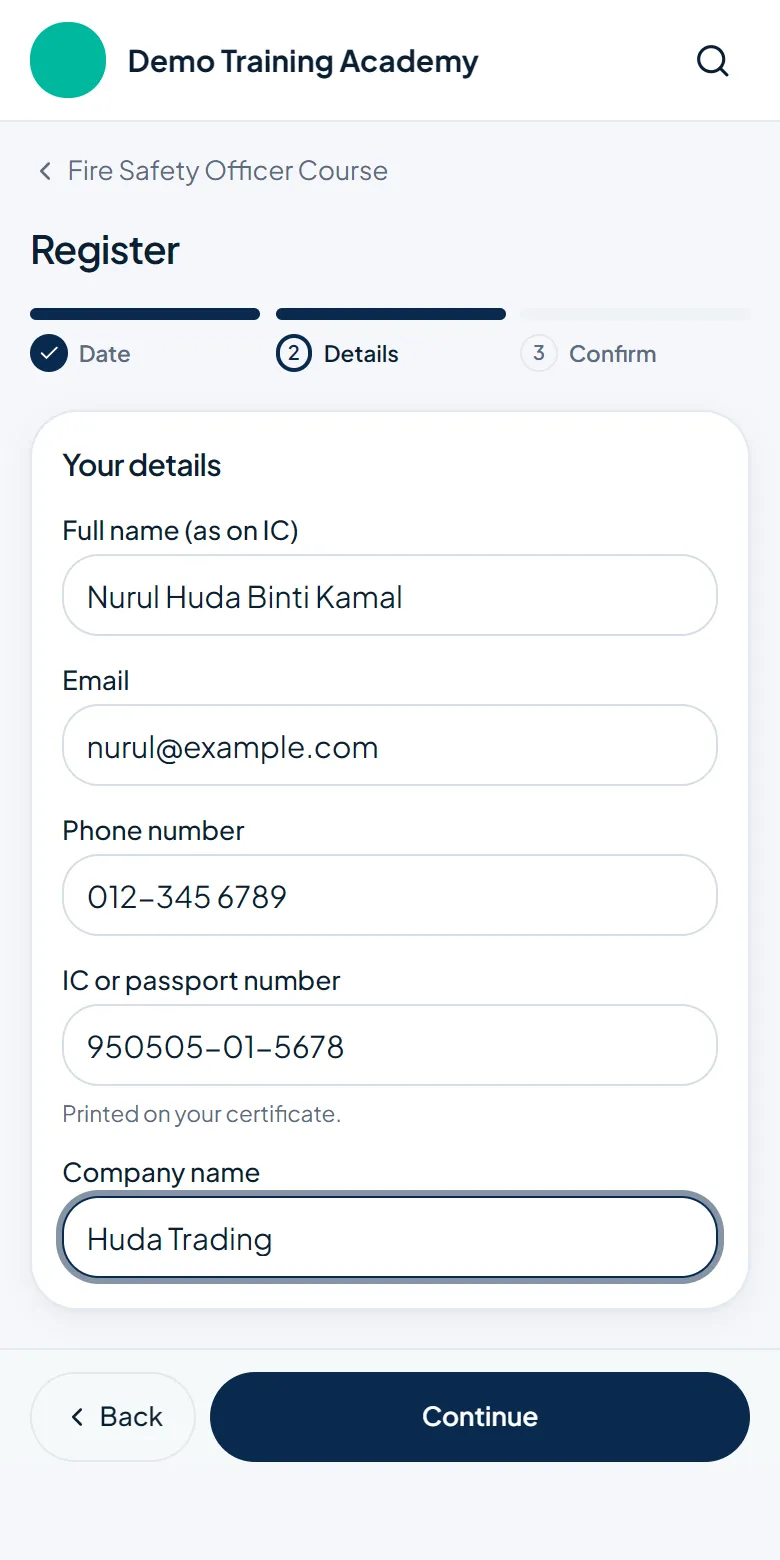
They fill in their name as on IC, email, phone, IC number and your questions. For a group, the contact person fills in everyone's details, or you can import a list for them (see Registrations).

Registration step 2: participant details

3. Confirm and pay

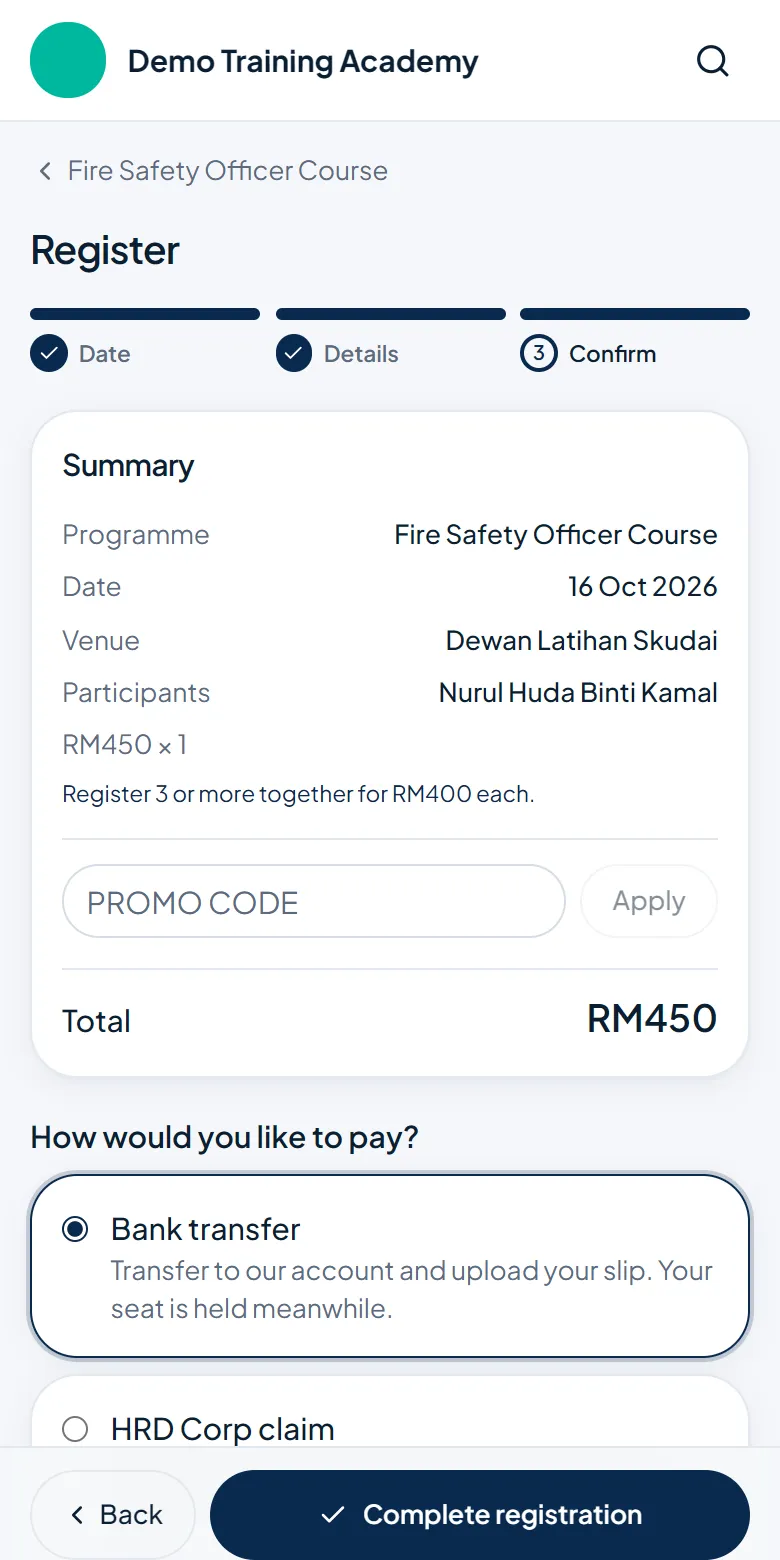
They see a summary with the total, can apply a promo code, choose how to pay and agree to the data notice.

Online payment opens CHIP. Bank transfer shows your account details and asks for the slip. HRD Corp and invoice confirm the seat straight away.

Registration step 3: summary, promo code and payment

Their ticket and receipt

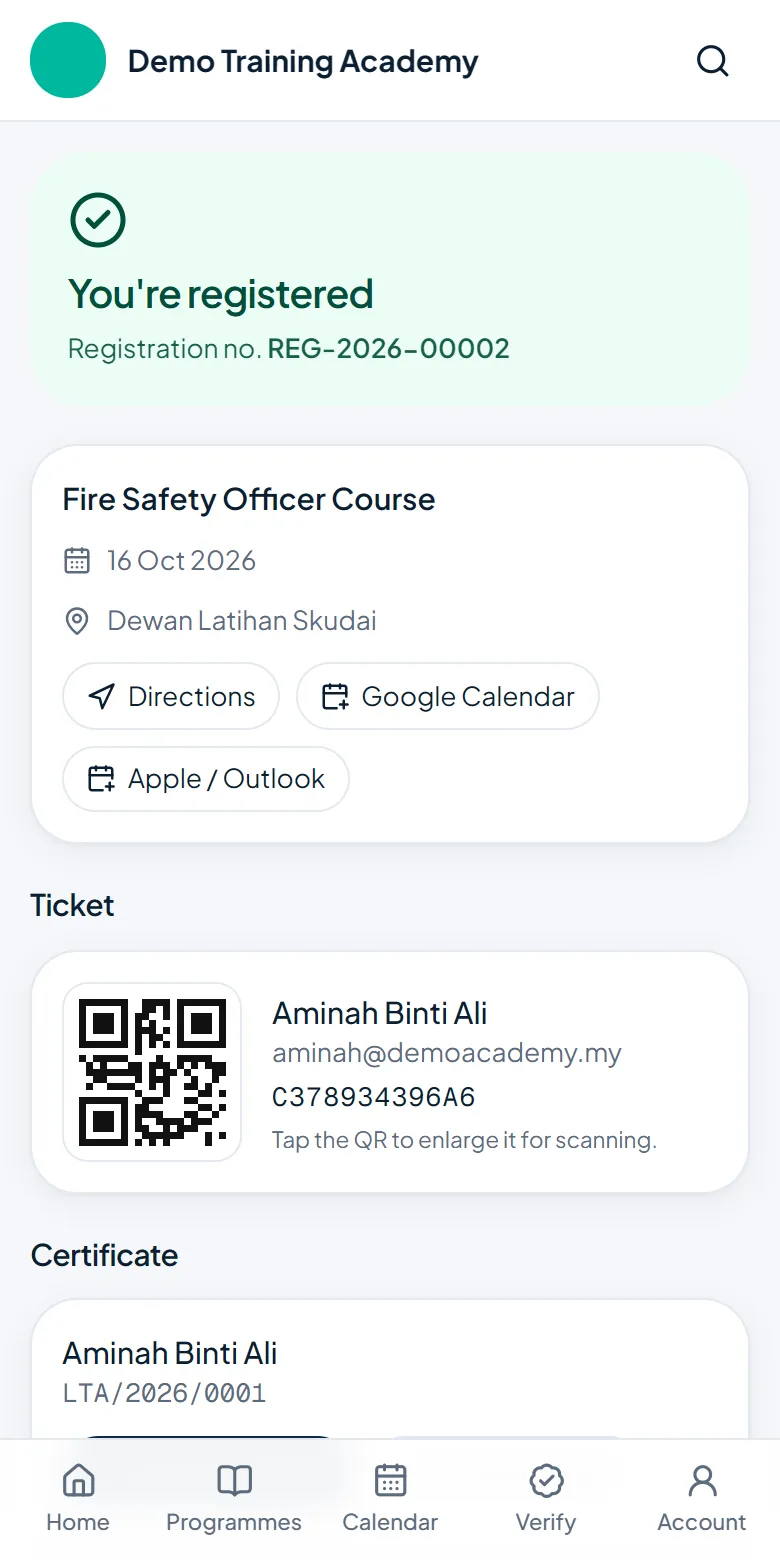
After registering they get an email and a page with everything in one place: dates, directions, add to calendar, their ticket QR and, once paid, the official receipt.

After the training, their certificate appears on the same page.

Participants can come back any time: tap Account on your site, enter their email and type the 6-digit code they receive.

The participant's page with ticket QR and certificate

Official receipt

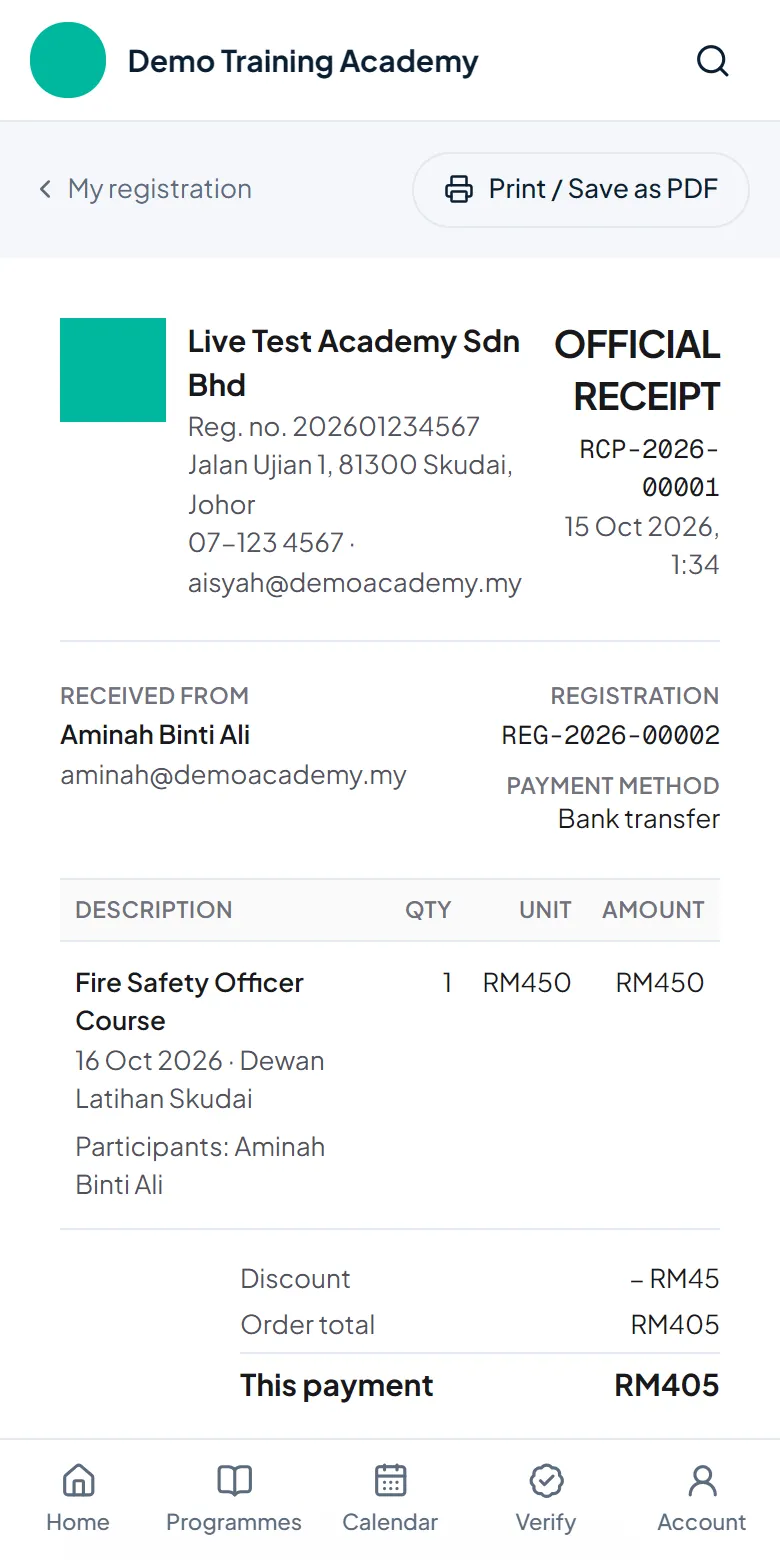
Every payment gets a numbered receipt with your business name, SSM number and address. They can print it or save it as PDF.

An official receipt

Part 11

Manage registrations

Check payments, add walk-ins and companies, and look after participant data.

All registrations

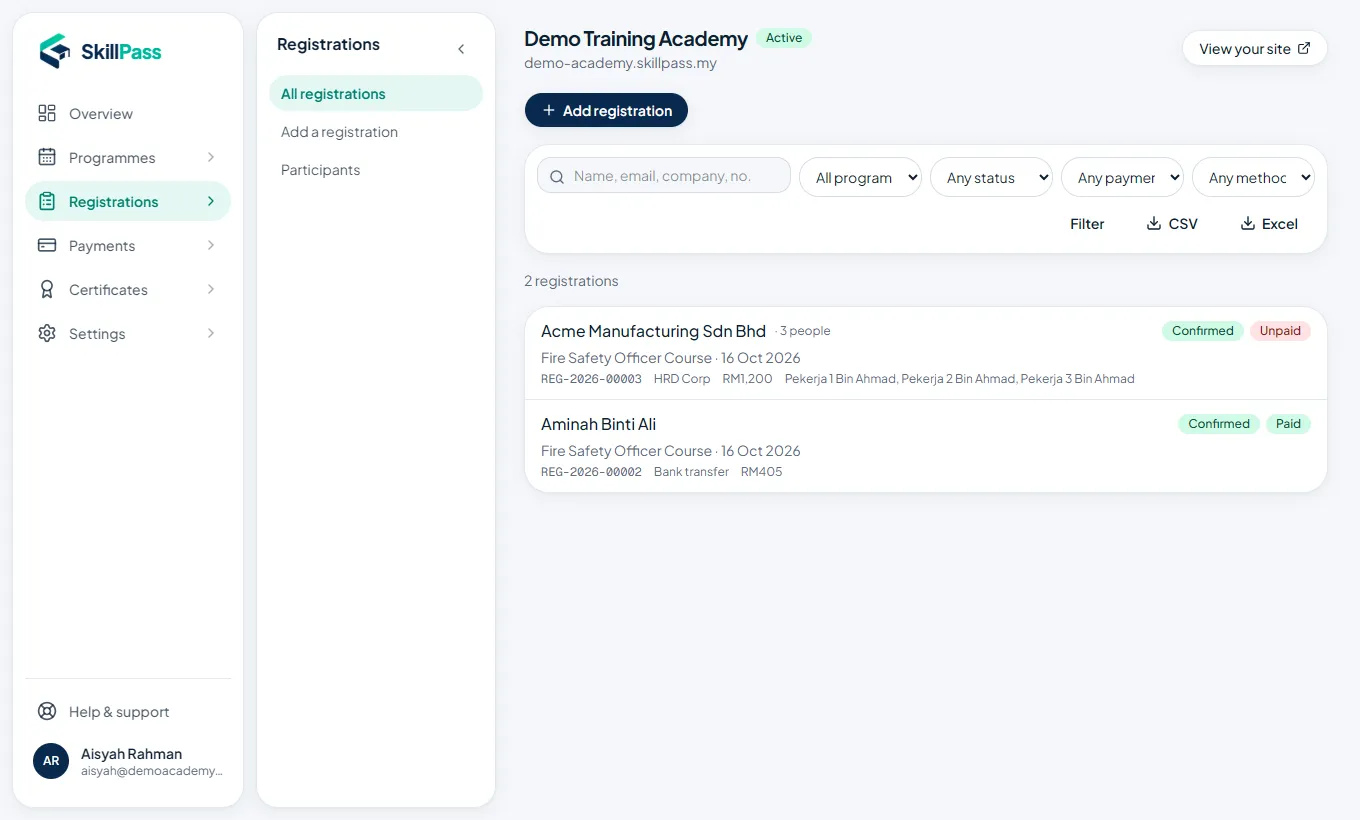
Registrations lists everyone with their status (Confirmed, Awaiting payment, Waitlisted, Cancelled) and payment. Filter by programme, session, status or payment method, or search by name. Tap CSV to download the list.

The registrations list with filters

Check a bank transfer slip

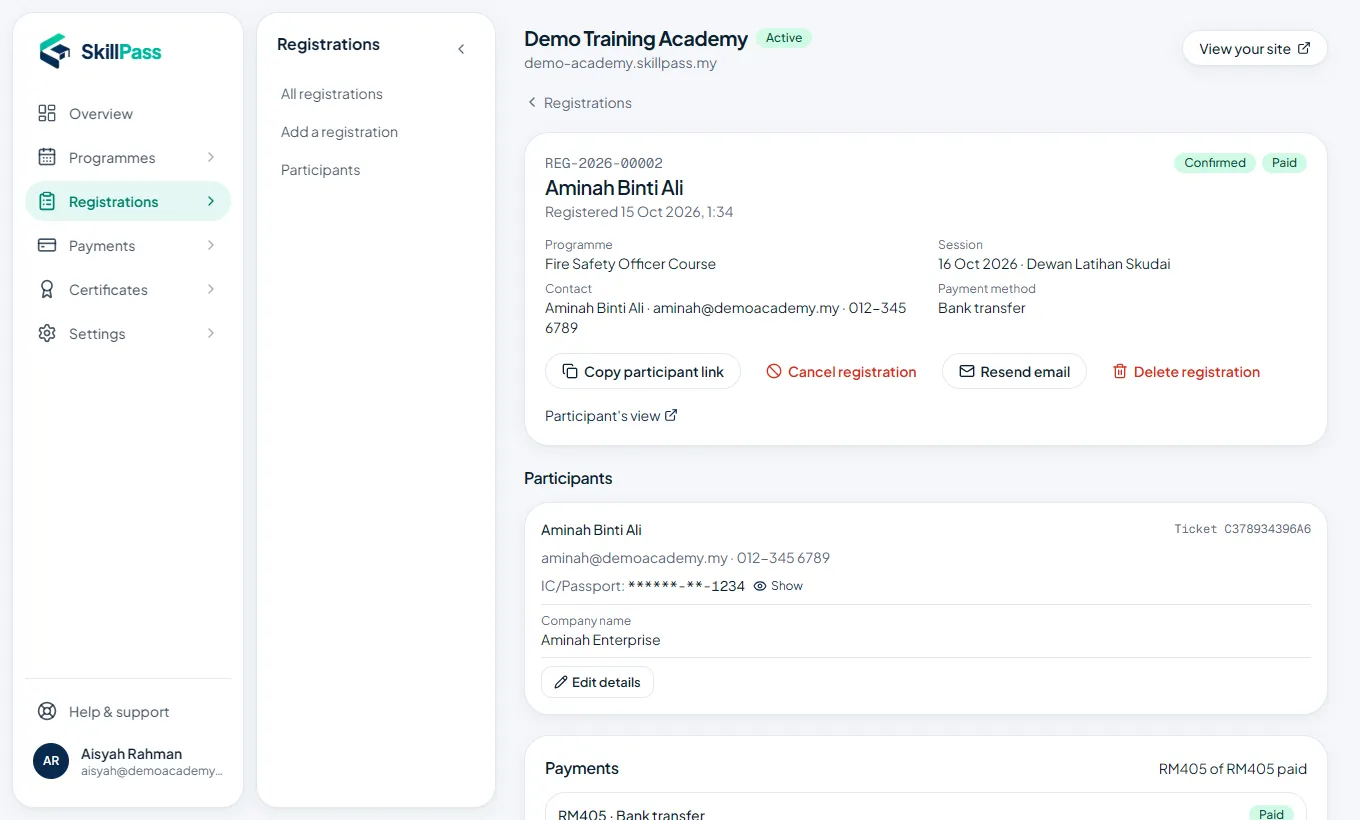
Open the registration. Under Payments you see the slip they uploaded. Check it against your bank account, then tap Approve. The participant is confirmed and gets their ticket and receipt by email.

On the same page you can edit their details, resend the email, copy their personal link, move them to another session or cancel.

IC numbers are hidden (******-**-1234). Tap Show only when you need the full number.

One registration: details, participants, payments with Approve

Add a walk-in or a company group

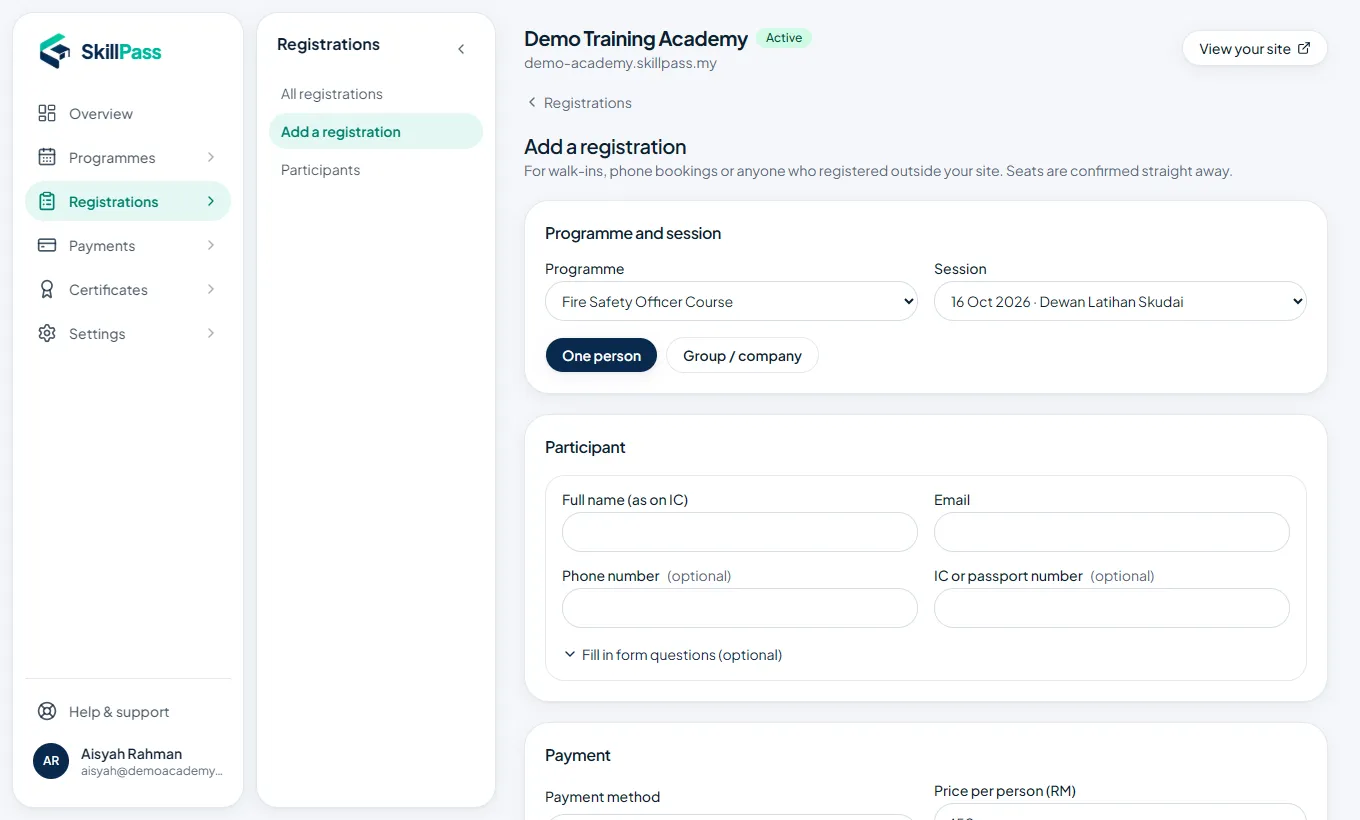
Registrations → Add a registration. Use it for walk-ins, phone bookings and companies that send a list.

For a company, choose Group / company and either type the names or import a CSV file. Download the template, fill it in Excel, upload it, and match your columns to the form questions.

Add a registration for walk-ins and companies

Payments

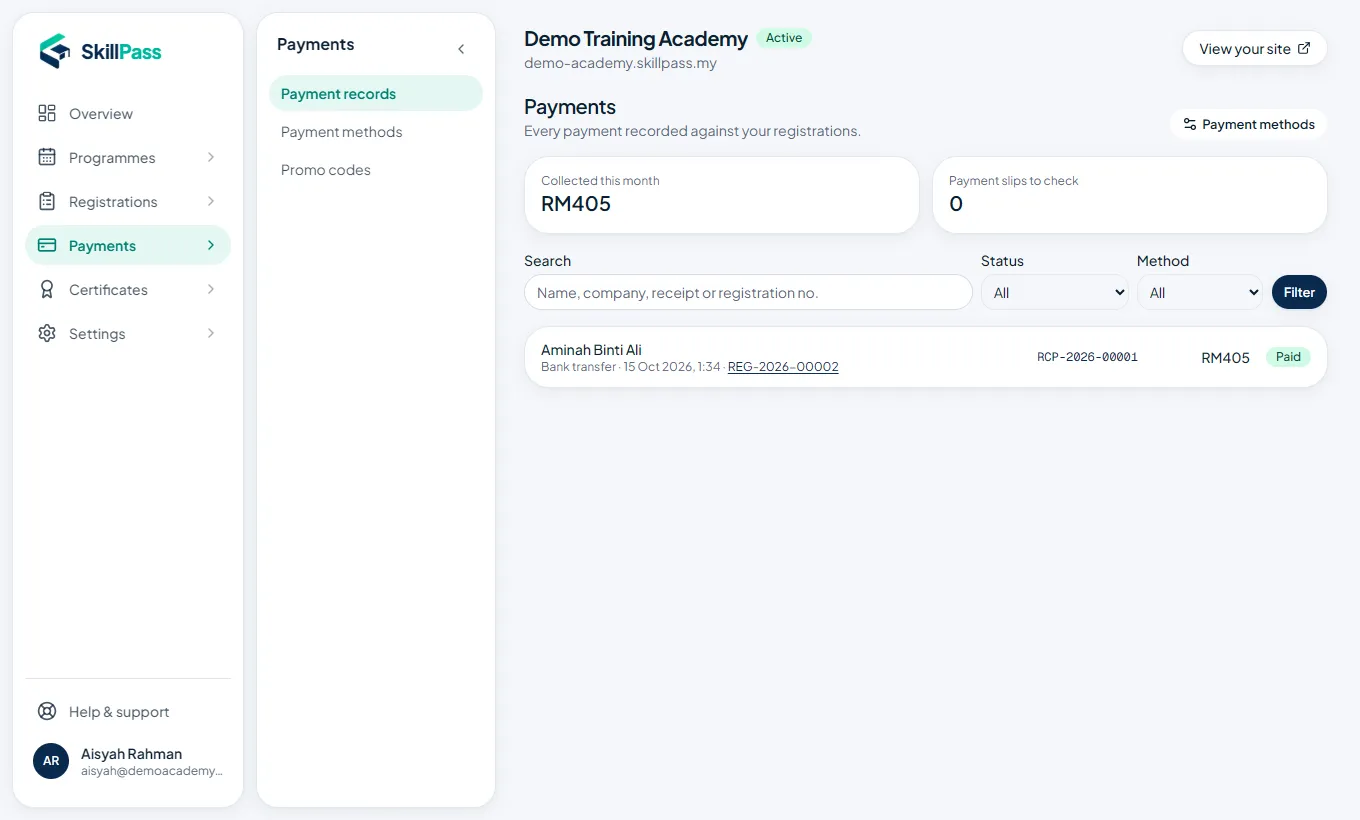
Payments lists every payment: online, bank transfer, HRD Corp, invoice and cash, with its status. Open one to go to its registration.

The payments list

Participants and personal data

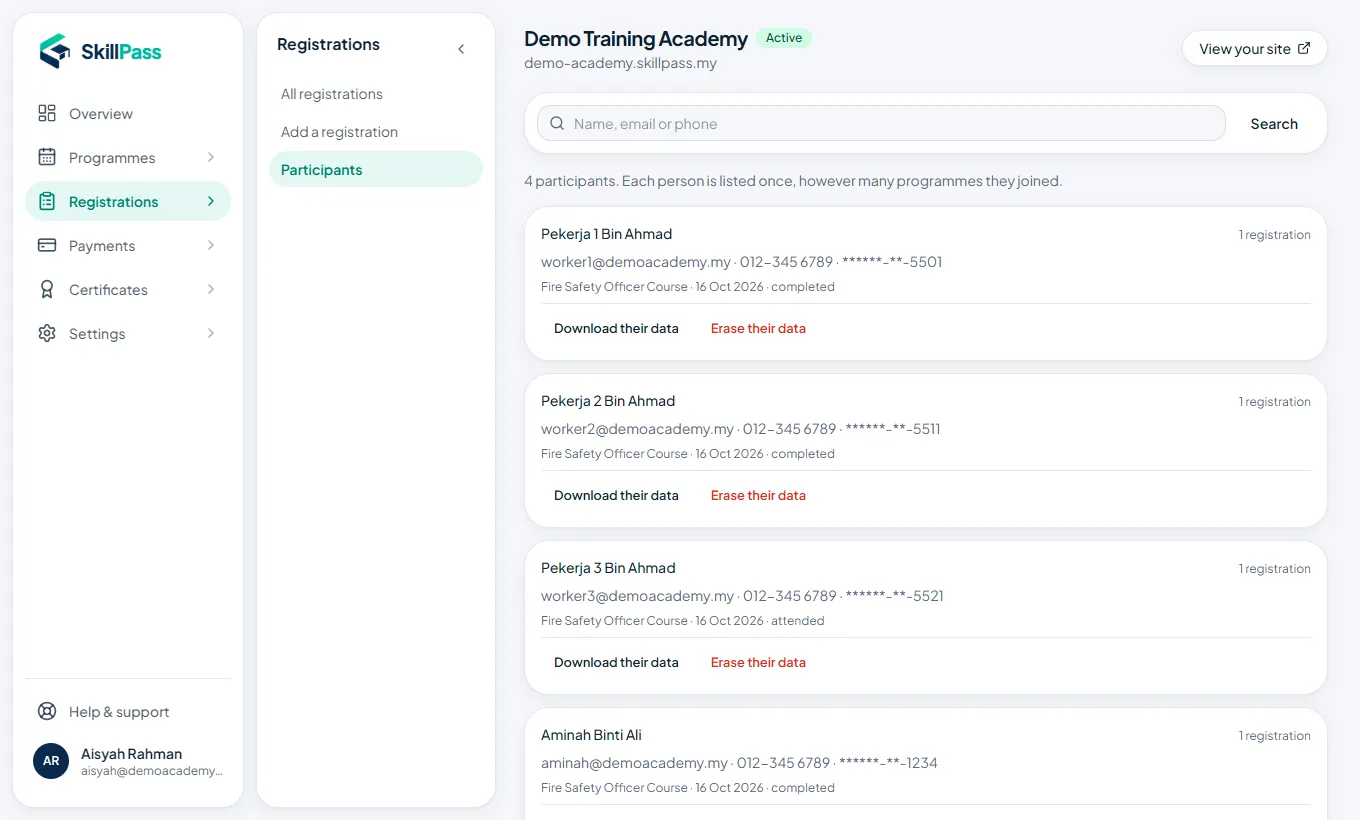
Registrations → Participants lists each person once, however many courses they joined.

If someone asks for their data under PDPA, tap Download their data. If they ask you to delete it, tap Erase their data.

The participants list with download and erase options

Part 12

On the training day

Take attendance by scanning tickets, by ticking names, or let participants check themselves in.

Open the session

Programmes → your programme → the session date. You see everyone registered, their payment and attendance. Tap Take attendance.

A session page with its participant list

Scan tickets or tick names

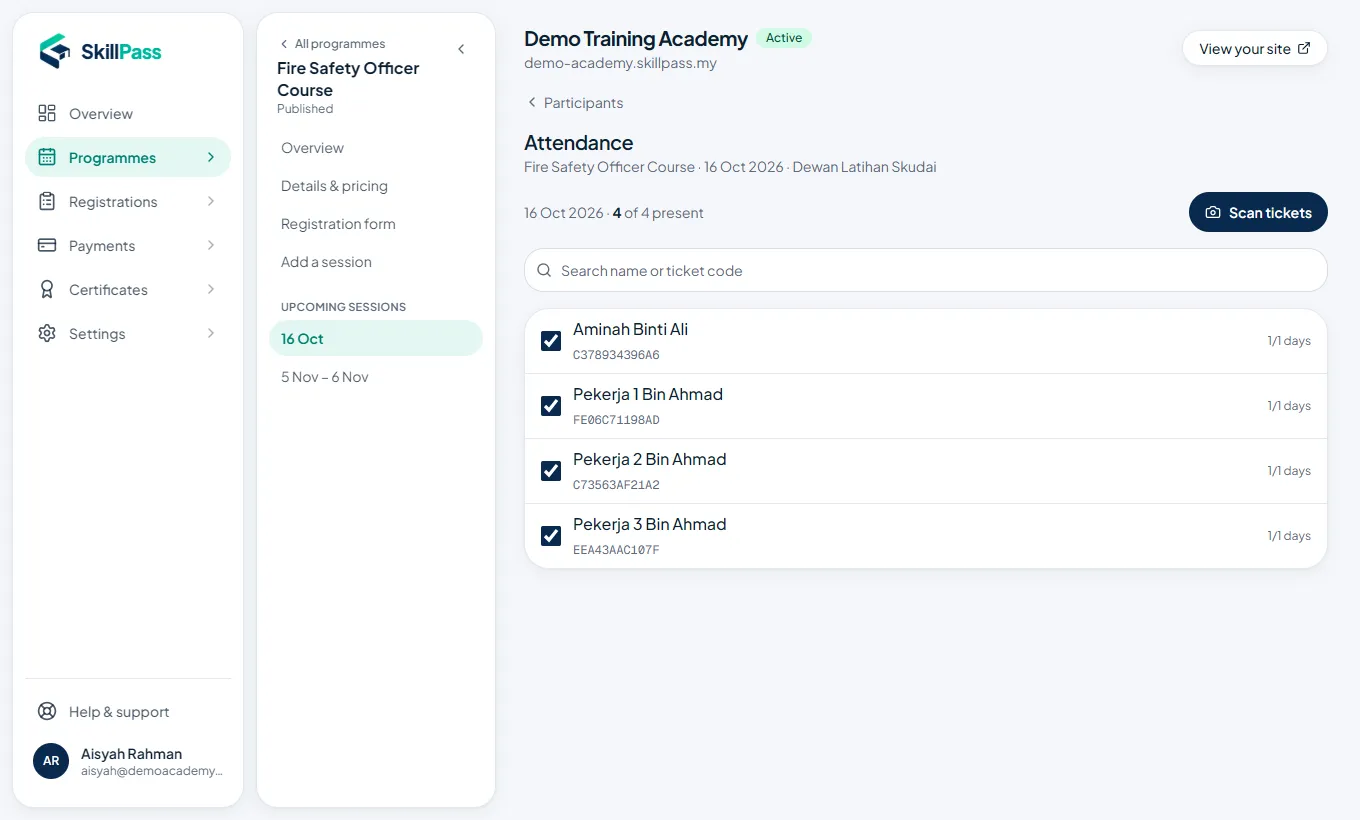
Tap Scan tickets and point your phone camera at each participant's ticket QR. They are marked present straight away and their phone shows Checked in.

No QR? Search the name or ticket code and tick the box. For courses longer than one day, choose the day at the top.

Give your trainers the Trainer role. They can scan tickets with their own phone without seeing any money matters.

Attendance: Scan tickets, search, and tick boxes

Self check-in

For big groups, open Self check-in QR and show it on the projector. Participants scan it with their phone to mark themselves present.

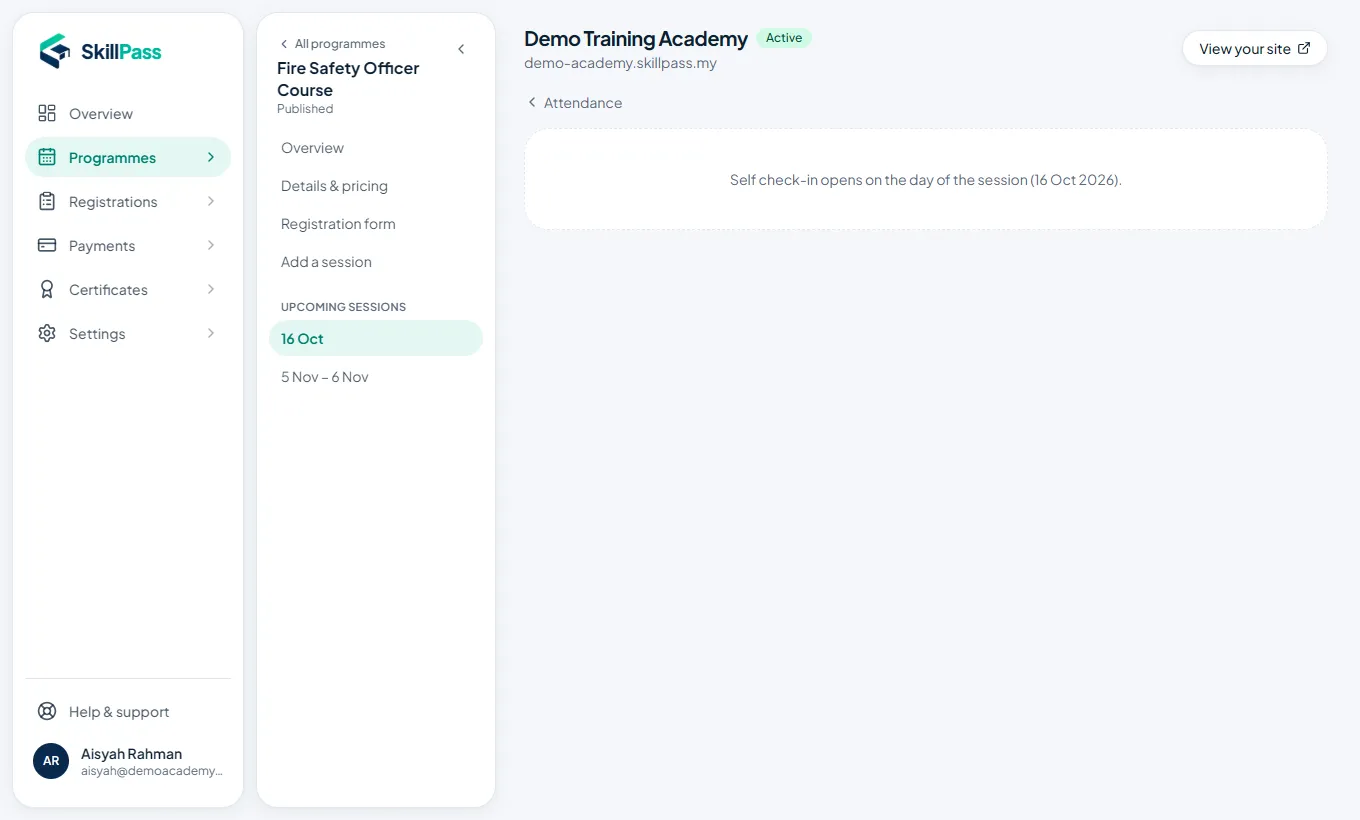
For an online class, paste the check-in link in the chat. Self check-in opens on the day of the session.

Self check-in QR page

Part 13

Certificates

Design once, then issue, email and verify in a few clicks.

1. Upload your design

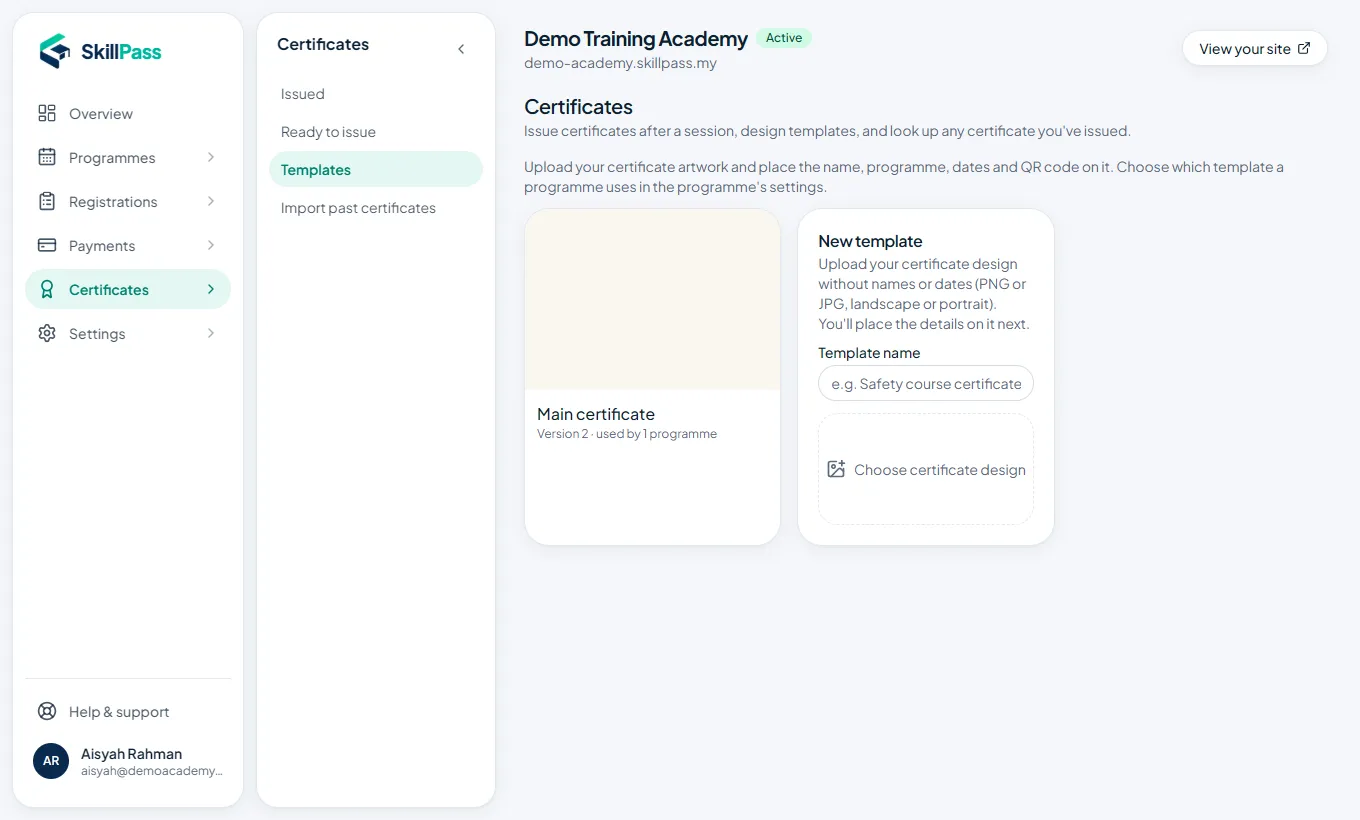
Certificates → Templates. Give it a name and upload your certificate design as a picture, without names on it. A4 landscape works well.

Certificate templates list

2. Place the fields

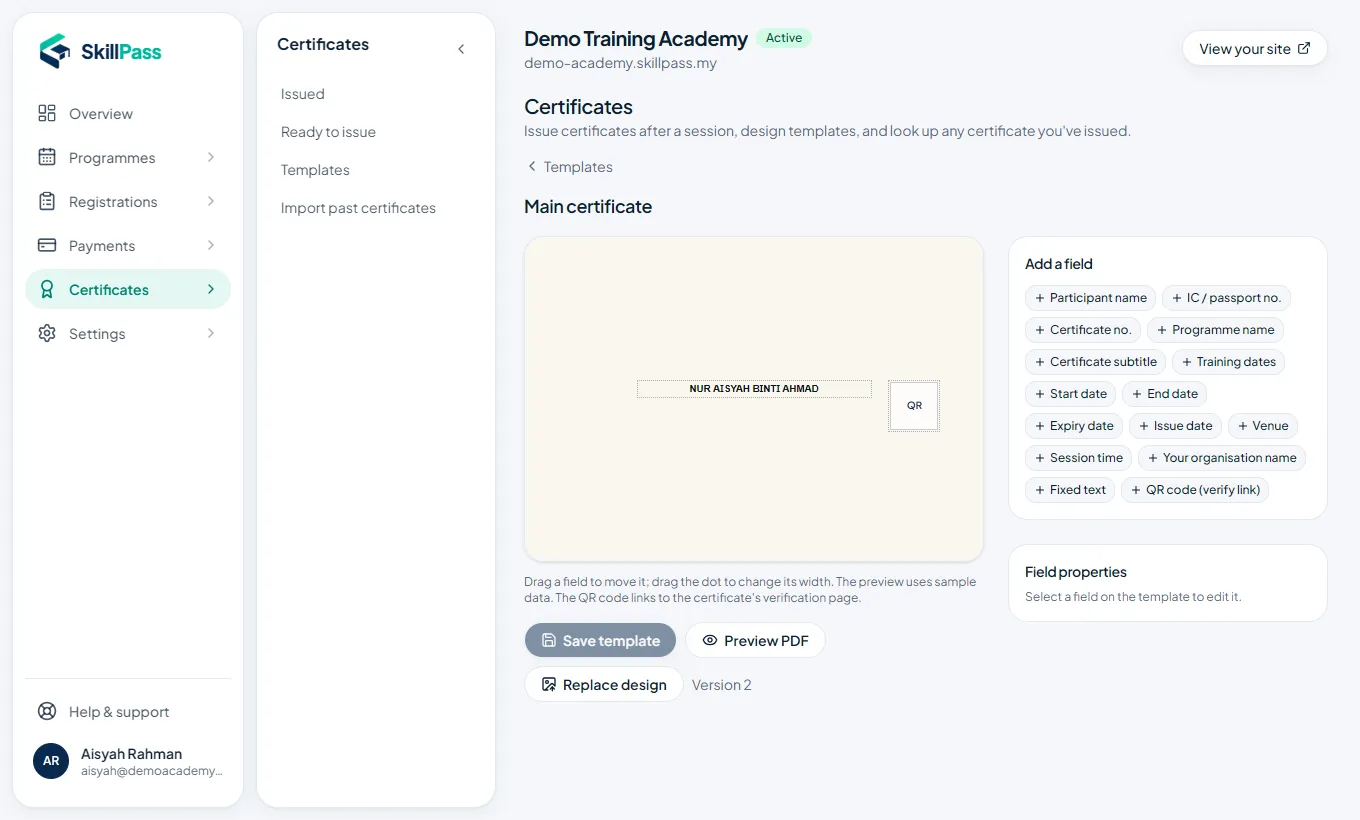
Tap the fields you want, such as Participant name, Certificate no., Programme name, Training dates and QR code (verify link). Drag each one to its place and drag the dot to change its width.

Tap a field on the design to change how it looks. Tap Preview PDF to check, then Save template.

In the programme's Details & pricing, choose this template.

Always add the QR code. It lets anyone check the certificate is real.
Certificate designer with fields to add and drag

3. Issue after the training

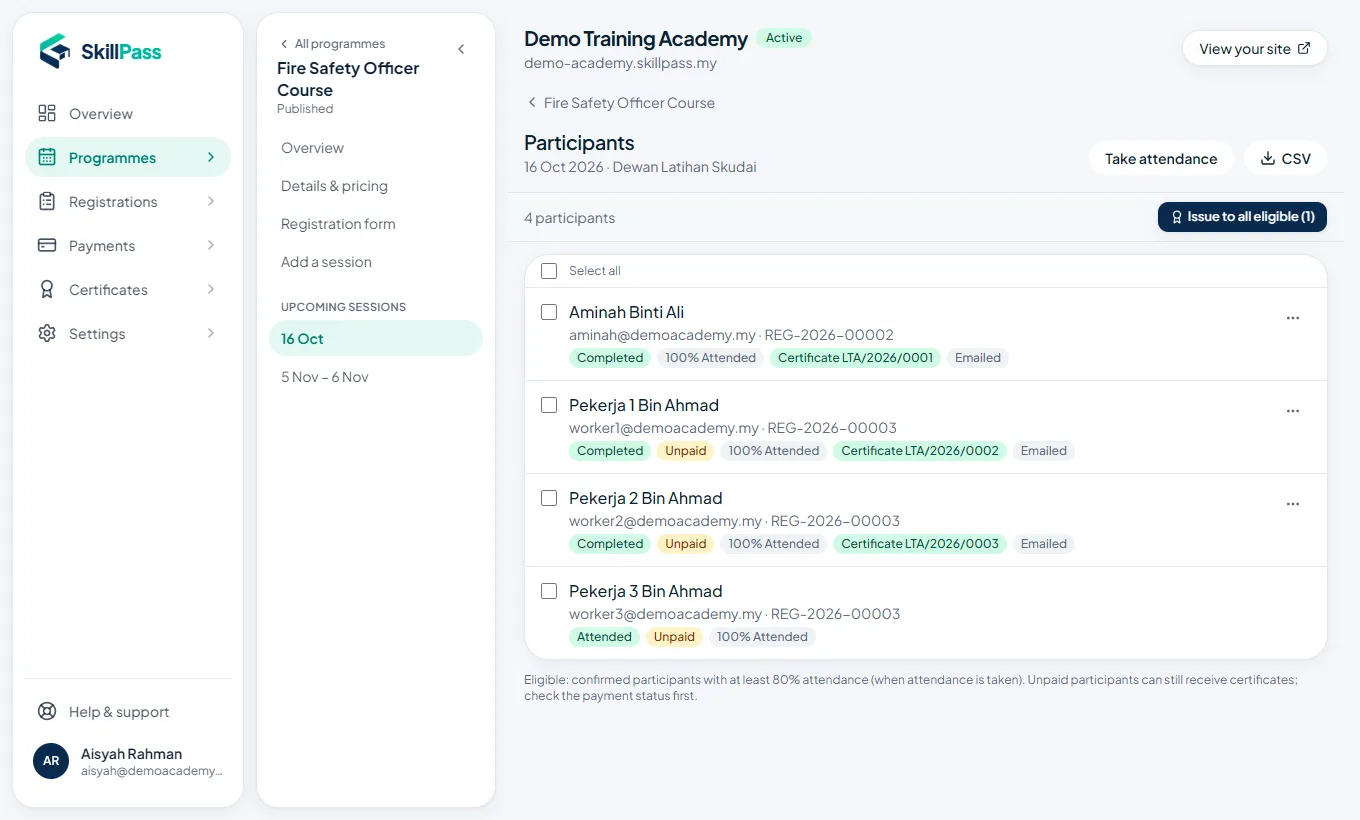
Open the session's participant list. Tap Issue to all eligible. Eligible means confirmed and with enough attendance.
To send certificates by email (PDF attached), tick the people and tap Email. Tap Download for PDFs to print. Use ··· on a person to reissue or revoke.

Unpaid participants can still receive certificates, so check the payment status first.

Session participants with Issue to all eligible, Email and Download

Ready to issue, and every certificate you issued

Certificates → Ready to issue lists finished sessions that still have people without certificates.

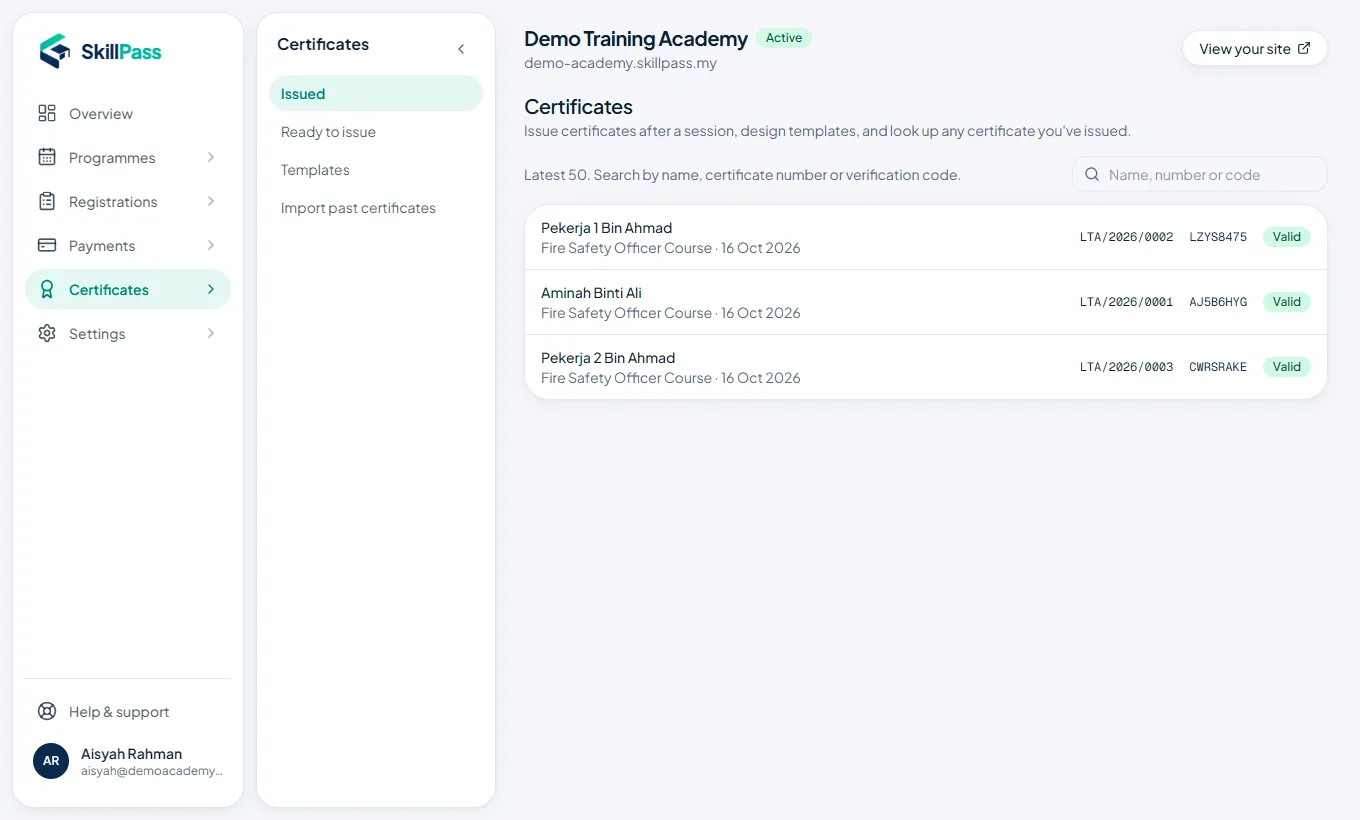
Certificates → Issued lets you search any certificate by name, number or IC.

All issued certificates with search

Import past certificates

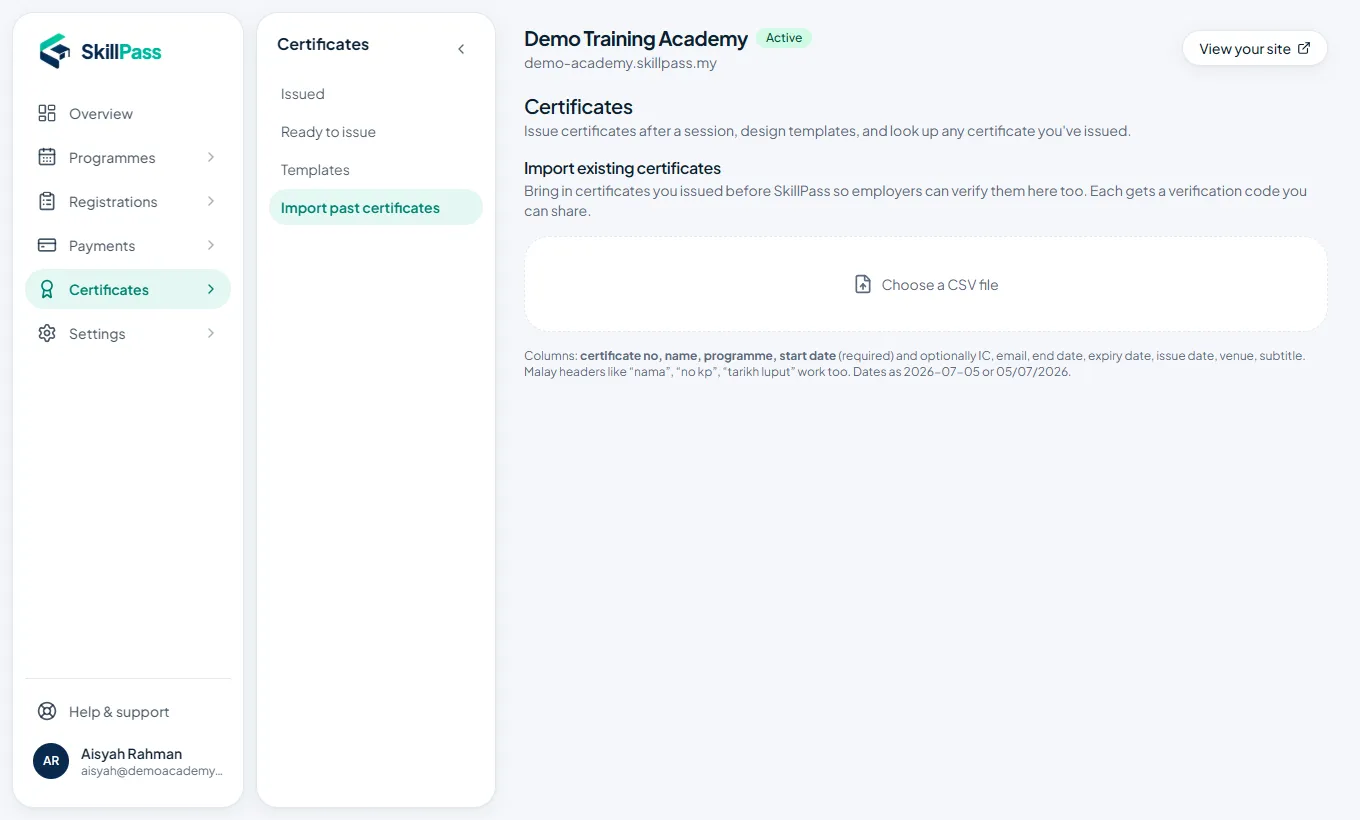
Moving from another system? Certificates → Import past certificates. Upload a CSV of your old certificates, and they can be verified on SkillPass too.

Import past certificates from a CSV file

Part 14

Checking a certificate is real

Employers and agencies can check any certificate in seconds, without an account.

Scan the QR code

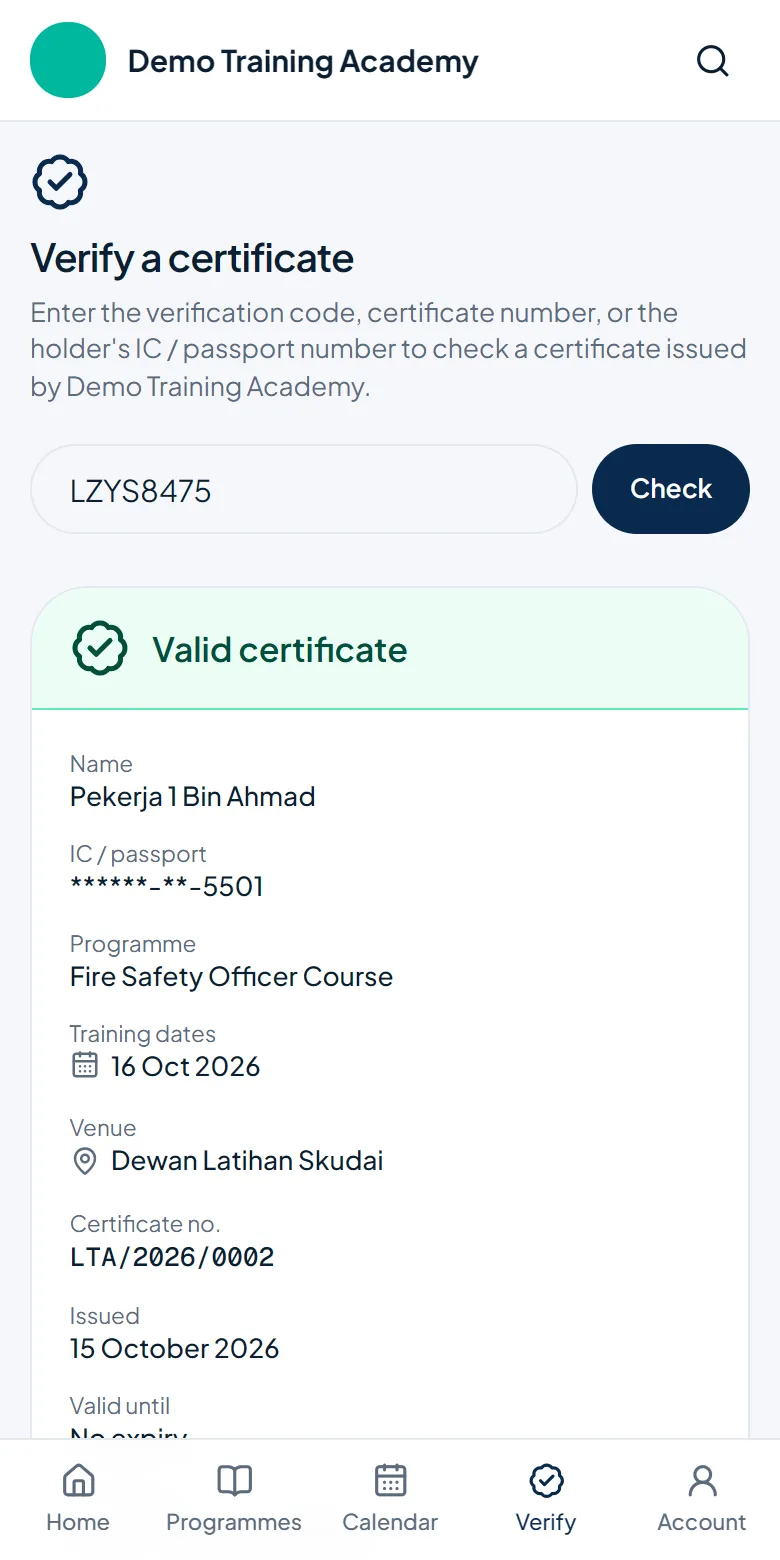
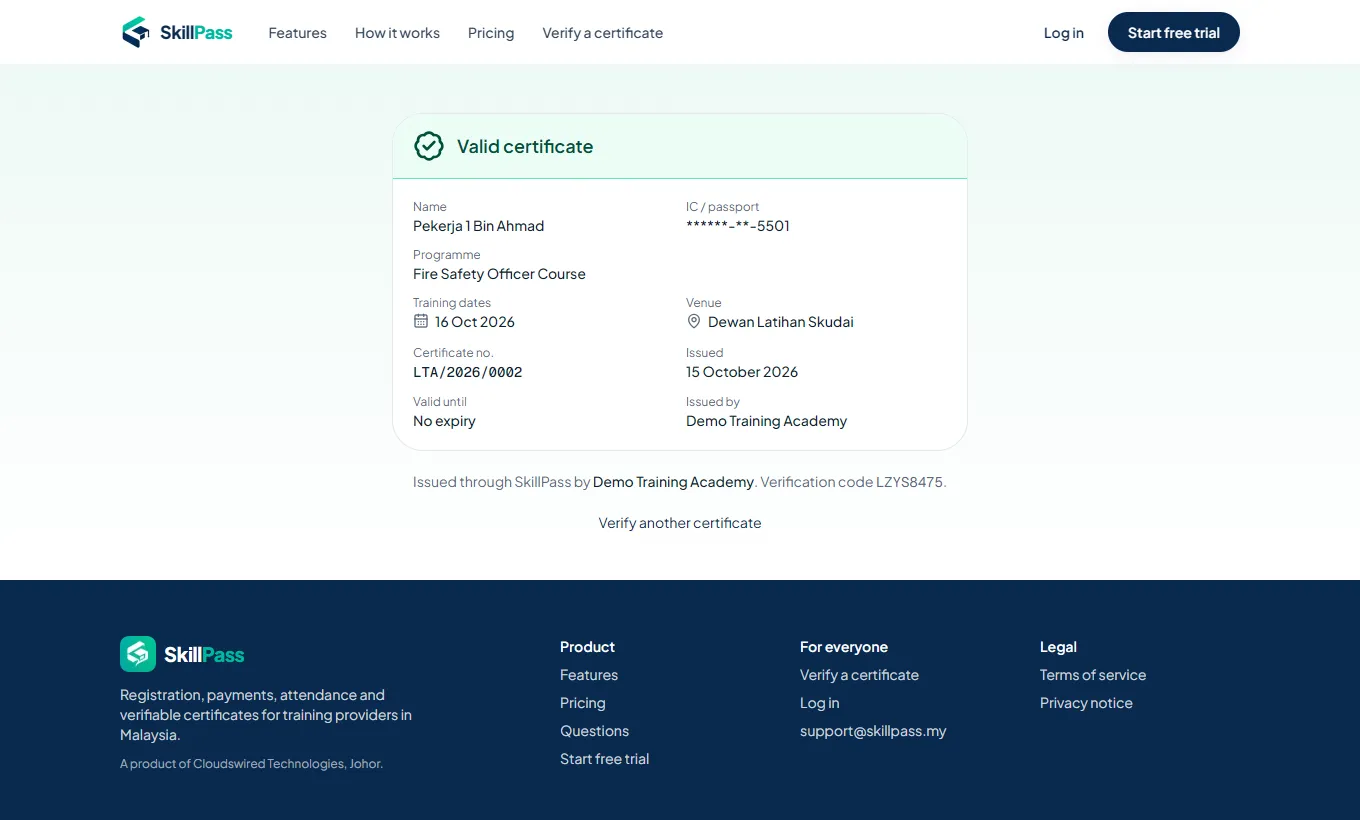
Scanning the QR on a certificate opens its page on skillpass.my. It shows whether it is Valid, Expired or Revoked, with the name, programme and dates.

The IC number is always partly hidden.

Public verification page showing a valid certificate

Search on your site

On your website, Verify lets anyone type a certificate code or number (and IC, if you allow it) to find a certificate you issued.

Phone view of Verify on the provider's site

Participants' own account

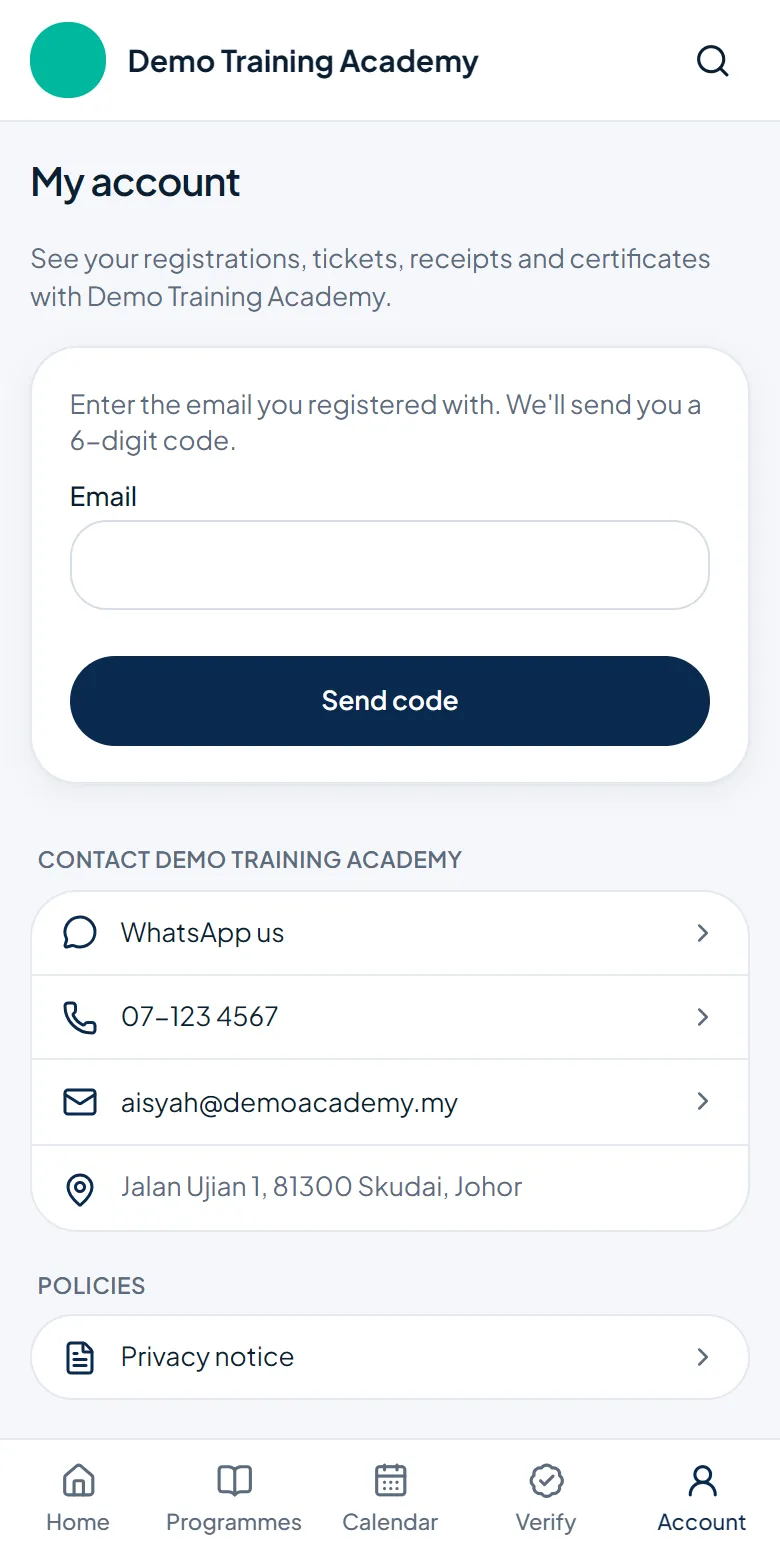
On your site, Account shows a participant all their trainings, tickets, receipts and certificates. They sign in with a 6-digit code sent to their email, so there is no password to remember.

The participant account sign-in on a phone

Part 15

Emails and WhatsApp

What participants receive, in your own words.

Email messages

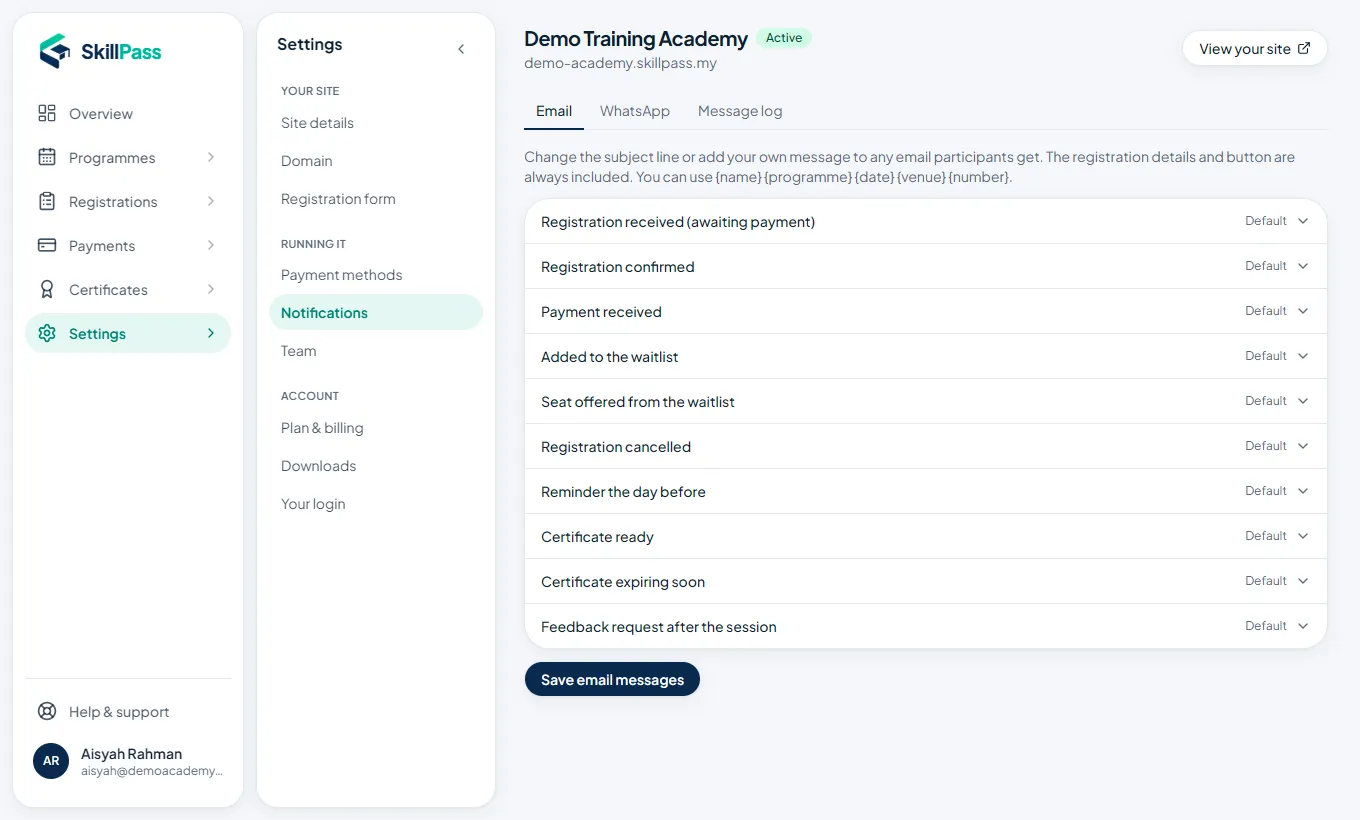
Settings → Notifications. Participants get emails when they register, when their payment is received, a reminder the day before, and when their certificate is ready.

Open any email to change its subject or add your own message. You can use {name}, {programme}, {date}, {venue} and {number}. Tap Save email messages.

Replies to these emails go to the email address in your Site details.

Email messages you can edit

WhatsApp

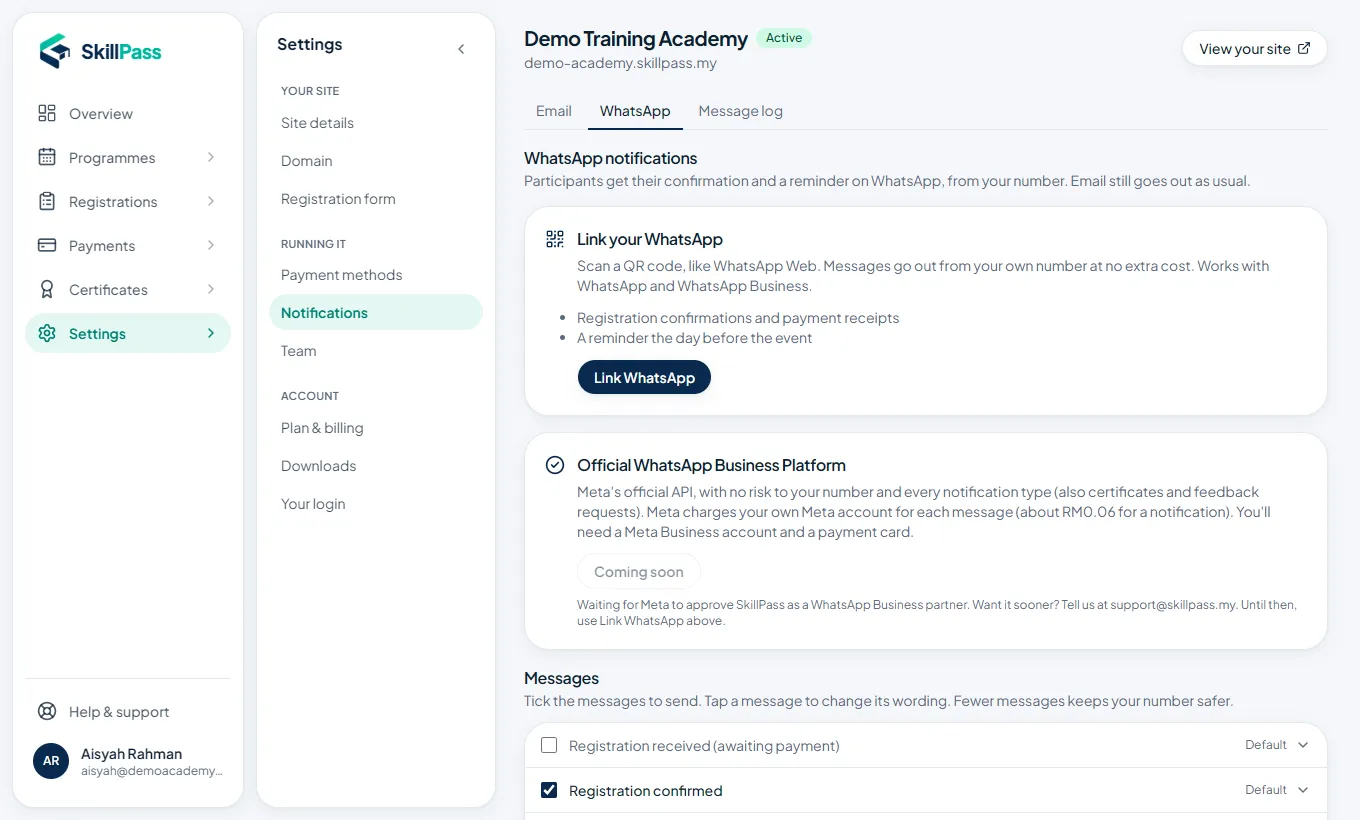
On plans that include WhatsApp, open the WhatsApp tab, tap Link WhatsApp and scan the QR with the WhatsApp app on your business phone, the same way as WhatsApp Web. Confirmations and day-before reminders are then also sent from your own number to participants who agreed.

The Message log tab shows every email and WhatsApp message sent, for 180 days.

Official WhatsApp Business is coming soon, once Meta approves SkillPass.

WhatsApp: link your own number by QR

Part 16

Use your own domain

Show your site on your own web address, such as daftar.yourcompany.my.

Connect a domain

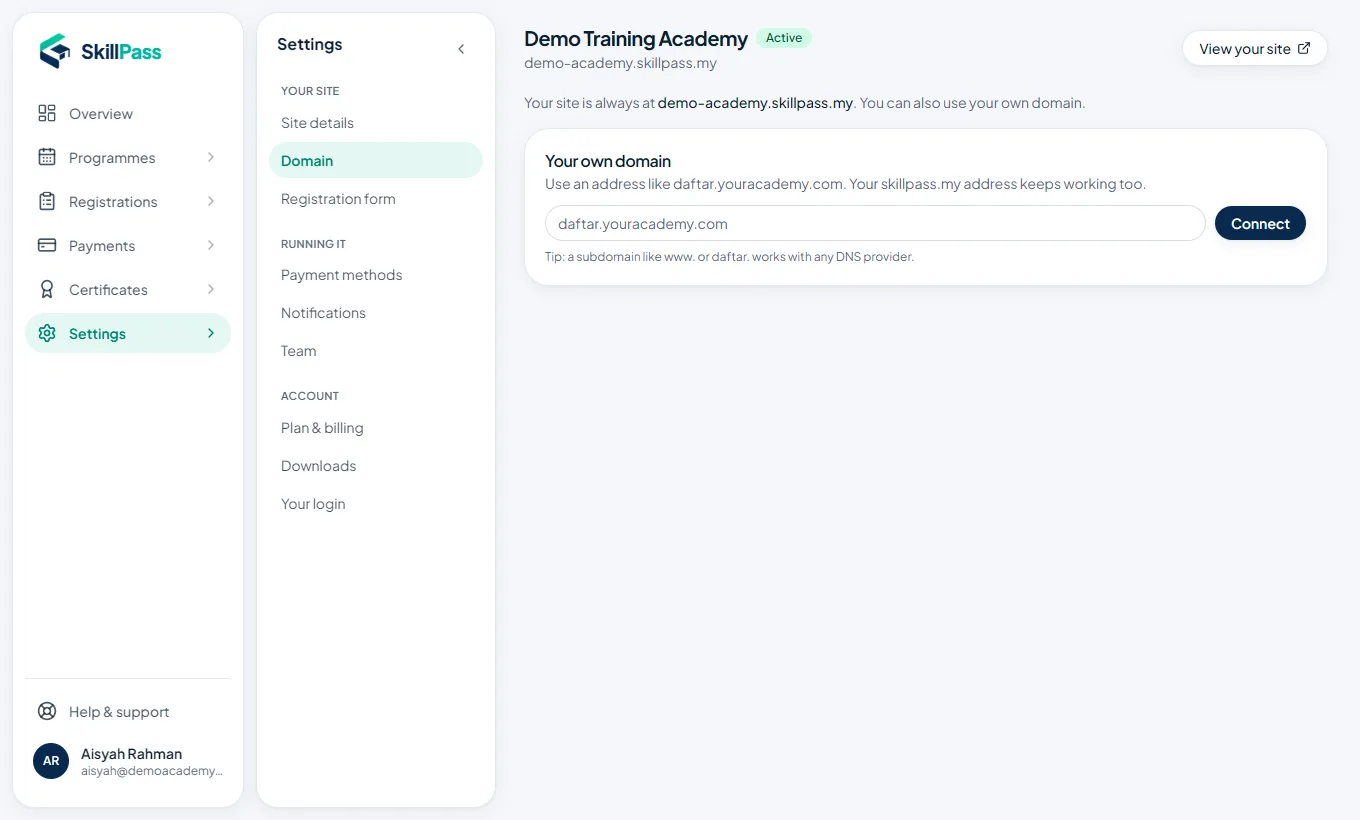
Settings → Domain. Enter the address you want (we suggest a subdomain like daftar.yourcompany.my or www.yourcompany.my), then follow the steps shown. You add one DNS record at the company where you bought the domain.

The page tells you when it is connected and secure. Your skillpass.my address keeps working too.

Domain settings

Part 17

Downloads and reports

Your data is yours. Download it whenever you like.

Download all your data

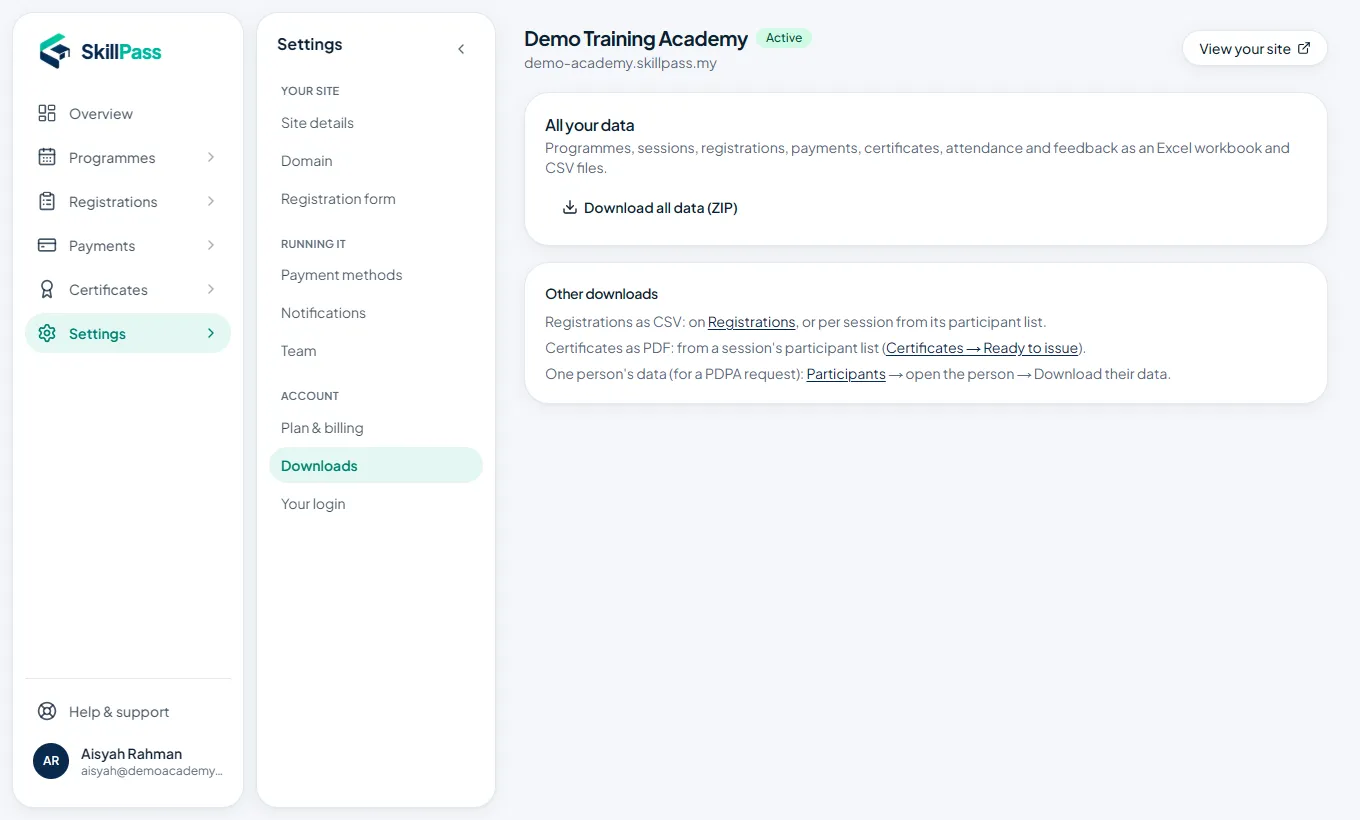
Settings → Downloads → Download all data (ZIP) gives you an Excel workbook and CSV files: programmes, sessions, registrations, payments, certificates, attendance and feedback.

Registrations and each session's participant list also have their own CSV download.

Downloads: all your data as Excel and CSV

Part 18

Tips and help

Small things that save time.

Good habits

  • Before your first real course, register yourself for a free test programme to see the whole journey as a participant.
  • Use Duplicate on a programme to create a similar one quickly.
  • Check Overview every morning: slips to approve and sessions this week are listed there.
  • Archive old programmes instead of deleting them. Their certificates keep working.
  • Change your own password in Settings → Your login. There you can also sign out on all your devices.

Need help?

Email support@skillpass.my with your site address and a screenshot of what you see. We reply on working days.

Still stuck?

Send us your site address and a screenshot of what you see. We reply on working days.

support@skillpass.myNew here? Start your free trial